The following sections describe the installation of the OpenClarity backend and the CLI, and show you the most common tasks that you can perform with OpenClarity.
This is the multi-page printable view of this section. Click here to print.
Getting Started
- 1: Deploy on AWS
- 2: Deploy on Azure
- 3: Deploy on Docker
- 4: Deploy on GCP
- 5: Deploy on Kubernetes
- 6: First Tasks on the UI
1 - Deploy on AWS
An AWS CloudFormation template is provided for quick deployment of the OpenClarity environment.
Note: To avoid extra costs (cross-region snapshots), you may want to deploy the OpenClarity AWS CloudFormation template in the same region where the majority of the VMs are that you want to scan with OpenClarity.
The following figure shows the basic AWS resources that the OpenClarity CloudFormation template creates:
-
a VPC with a public and private subnet, and
-
an AWS Internet Gateway (IGW) and NAT Gateway (NGW) into the VPC.

The public subnet (OpenClarityServerSubnet) hosts the OpenClarity Server (OpenClarityServer) EC2 instance. The OpenClarity server houses the scanning configuration, the UI, and other control components. The EC2 instance is assigned an external IPv4 address (EIP) for SSH and web UI access.
The private subnet (OpenClarityScannerSubnet) hosts the VM snapshot instances (EC2) that are scanned for security vulnerabilities.
Prerequisites
- Have an AWS account.
- Create an EC2 key pair.
Deployment steps
To deploy the OpenClarity AWS CloudFormation Stack, you can:
- click this quick-create link to navigate directly to the AWS CloudFormation console and jump to the wizard instructions, or
- complete the following steps.
-
Download the latest OpenClarity release.
wget https://github.com/openclarity/openclarity/releases/download/v1.1.2/aws-cloudformation-v1.1.2.tar.gzAlternatively, copy the AWS CloudFormation template file from the project repository to deploy the latest development code and skip the next step.
-
Create a new directory and extract the files.
mkdir aws-cloudformation-v1.1.2 tar -xvzf aws-cloudformation-v1.1.2.tar.gz -C aws-cloudformation-v1.1.2 -
Log in to the AWS CloudFormation console and go to the AWS CloudFormation Stacks section, then select Create Stack > With New Resources (standard).
-
Check Template is ready and Upload a template file, then click Upload a template file/Choose file and upload the previously downloaded CFN template file.

-
In the OpenClarity CloudFormation Stack wizard, set the following:
- Enter a name for the stack.
- Select the InstanceType (defaults to
t2.largefor the OpenClarity Server, and the scanner VMs). - Specify the SSH key for the EC2 instance in the KeyName field. You will need this key to connect to OpenClarity.
- Adjust SSHLocation according to your policies.
- Do not change AdvancedConfiguration, unless you are building from a custom registry.
- Click NEXT.
- (Optional) Add tags as needed for your environment. You can use the defaults unless you need to adjust for your own policies.
- Click NEXT, then scroll to the bottom of the screen, and check I acknowledge….
- Click SUBMIT.
-
Once the stack is deployed successfully, copy the OpenClarity SSH address from the Outputs tab.

-
Open an SSH tunnel to OpenClarity the server
ssh -N -L 8080:localhost:80 -i "<Path to the SSH key specified during install>" ubuntu@<OpenClarity SSH Address copied during install> -
Access the OpenClarity UI.
-
Open the OpenClarity UI in your browser at http://localhost:8080/. The dashboard opens.
-
(Optional) If needed, you can access the API at http://localhost:8080/api. For details on the API, see the API reference.

-
Next steps
Complete the First Tasks on the UI.
2 - Deploy on Azure
Prerequisites
-
Have an Azure subscription.
-
Create an SSH public key for Linux. Please follow these instructions for Linux and Mac users or these for Windows users. Once you have an RSA private key, convert it to an SSH2 public key with:
ssh-keygen -e -f ~/.ssh/id_rsa.pub > ~/.ssh/id_rsa2.pub
Deployment steps
-
Click here to deploy OpenClarity’s custom template.
-
Fill out the required Project details and Instance details in the Basics tab.

You can set the following parameters:
Parameter Required Description Subscription True Azure subscription where resources will be billed. Region False Azure region where resources will be deployed. OpenClarity Deploy Postfix True Postfix for Azure resource group name (e.g. openclarity-<postfix>).OpenClarity Server SSH Username True SSH Username for the OpenClarity Server Virtual Machine. OpenClarity Server SSH Public Key True SSH Public Key for the OpenClarity Server Virtual Machine. Paste the contents of ~/.ssh/id_rsa2.pubhere.OpenClarity Server VM Size True The size of the OpenClarity Server Virtual Machine. OpenClarity Scanner VMs Size True The size of the OpenClarity Scanner Virtual Machines. Security Type False Security Type of the OpenClarity Server Virtual Machine, e.g. TrustedLaunch(default) orStandard. -
(Optional) In the Advanced tab, modify the Container Image for each service if a specific OpenClarity version is required. Then, select the delete policy and the database.

Parameter Required Description Service Container Image True Docker Container Image to use for each service. Asset Scan Delete Policy True Delete Policy for resources created when performing an asset scan, e.g. Always,OnSuccessorNever.Database To Use True Database type to use, e.g. SQLite,PostgreSQLorExternal PostgreSQL. -
Click Review + create to create the deployment.
-
Once the deployment is completed successfully, copy the OpenClarity SSH address from the Outputs tab.

-
Open an SSH tunnel to OpenClarity the server
ssh -N -L 8080:localhost:80 -i "<Path to the SSH key specified during install>" ubuntu@<OpenClarity SSH Address copied during install> -
Access the OpenClarity UI.
-
Open the OpenClarity UI in your browser at http://localhost:8080/. The dashboard opens.
-
(Optional) If needed, you can access the API at http://localhost:8080/api. For details on the API, see the API reference.
-
Next steps
Complete the First Tasks on the UI.
3 - Deploy on Docker
Prerequisites
- Install Docker.
Deployment steps
To run OpenClarity in Docker on a local machine, complete the following steps.
-
Download the latest OpenClarity release.
wget https://github.com/openclarity/openclarity/releases/download/v1.1.2/docker-compose-v1.1.2.tar.gz -
Create a new directory, extract the files and navigate to the directory.
mkdir docker-compose-v1.1.2 tar -xvzf docker-compose-v1.1.2.tar.gz -C docker-compose-v1.1.2 cd docker-compose-v1.1.2 -
Start every control plane element with the docker compose file.
docker compose --project-name openclarity --file docker-compose.yml up -d --wait --remove-orphansThe output should be similar to:
[+] Running 14/14
⠿ Network openclarity                        Created                                                       0.2s
⠿ Volume "openclarity_grype-server-db"       Created                                                       0.0s
⠿ Volume "openclarity_apiserver-db-data"     Created                                                       0.0s
⠿ Container openclarity-orchestrator-1       Healthy                                                      69.7s
⠿ Container openclarity-yara-rule-server-1   Healthy                                                      17.6s
⠿ Container openclarity-exploit-db-server-1  Healthy                                                      17.7s
⠿ Container openclarity-swagger-ui-1         Healthy                                                       7.8s
⠿ Container openclarity-trivy-server-1       Healthy                                                      26.7s
⠿ Container openclarity-uibackend-1          Healthy                                                      17.6s
⠿ Container openclarity-ui-1                 Healthy                                                       7.7s
⠿ Container openclarity-freshclam-mirror-1   Healthy                                                       7.8s
⠿ Container openclarity-grype-server-1       Healthy                                                      37.3s
⠿ Container openclarity-gateway-1            Healthy                                                       7.7s
⠿ Container openclarity-apiserver-1          Healthy                                                      17.7s
Please note that the
image_override.envfile enables you to use the images you build yourself. You can override parameters in thedocker-compose.ymlby passing a custom env file to thedocker compose upcommand via the--env-fileflag. The/installation/docker/image_override.envfile contains an example overriding all the container images. -
Check the running containers in the Docker desktop.

-
Access the OpenClarity UI. Navigate to http://localhost:8080/ in your browser.
Next steps
Complete the First Tasks on the UI.
Clean up steps
-
After you’ve finished your tasks, stop the running containers.
docker compose --project-name openclarity --file docker-compose.yml down --remove-orphans
4 - Deploy on GCP
Prerequisites
- You can install OpenClarity using the CLI, so you have to have gcloud on your computer available beforehand. For details on installing and configuring gcloud, see the official installation guide.
- If you have already installed OpenClarity before and want to reinstall it, you have to manually restore deleted roles that were created during the previous installation.
Deployment steps
To install OpenClarity on Google Cloud Platform (GCP), complete the following steps.
-
Download the newest GCP deployment release from GitHub and extract it to any location.
wget https://github.com/openclarity/openclarity/releases/download/v1.1.2/gcp-deployment-v1.1.2.tar.gz -
Create a new directory, extract the files and navigate to the directory.
mkdir gcp-deployment-v1.1.2 tar -xvzf gcp-deployment-v1.1.2.tar.gz -C gcp-deployment-v1.1.2 cd gcp-deployment-v1.1.2 -
Copy the example configuration file and rename it.
cp openclarity-config.example.yaml openclarity-config.yaml -
The following table contains all the fields that can be set in the
openclarity-config.yamlfile. You have to set at least the required ones.Field Required Default Description zoneyes The Zone to locate the OpenClarity server. machineTypeyes The machine type for the OpenClarity server. regionyes The region to locate OpenClarity. scannerMachineTypee2-standard-2Machine type to use for the Scanner instances. scannerSourceImageprojects/ubuntu-os-cloud/global/images/ubuntu-2204-jammy-v20230630Source image to use for the Scanner instances. databaseToUseSQLiteThe database that OpenClarity should use. apiserverContainerImageghcr.io/openclarity/openclarity-apiserver:1.1.2The container image to use for the apiserver. orchestratorContainerImageghcr.io/openclarity/openclarity-orchestrator:1.1.2The container image to use for the orchestrator. uiContainerImageghcr.io/openclarity/openclarity-ui:1.1.2The container image to use for the ui. uibackendContainerImageghcr.io/openclarity/openclarity-ui-backend:1.1.2The container image to use for the uibackend. scannerContainerImageghcr.io/openclarity/openclarity-cli:1.1.2The container image to use for the scanner. exploitDBServerContainerImageghcr.io/openclarity/exploit-db-server:v0.2.4The container image to use for the exploit db server. trivyServerContainerImagedocker.io/aquasec/trivy:0.41.0The container image to use for the trivy server. grypeServerContainerImageghcr.io/openclarity/grype-server:v0.7.0The container image to use for the grype server. freshclamMirrorContainerImageghcr.io/openclarity/freshclam-mirror:v0.2.0The container image to use for the fresh clam mirror server. postgresqlContainerImagedocker.io/bitnami/postgresql:12.14.0-debian-11-r28The container image to use for the postgresql server. assetScanDeletePolicyAlwaysWhen asset scans should be cleaned up after scanning. postgresDBPasswordPostgres DB password. Only required if DatabaseToUse is Postgresql. externalDBNameDB to use in the external DB. Only required if DatabaseToUse is External. externalDBUsernameUsername for the external DB. Only required if the DatabaseToUse is External. externalDBPasswordPassword for the external DB. Only required if the DatabaseToUse is External. externalDBHostHostname or IP for the external DB. Only required if the DatabaseToUse is External. externalDBPortPort for the external DB. Only required if the DatabaseToUse is External. -
Deploy OpenClarity using gcloud deployment-manager.
gcloud deployment-manager deployments create <openclarity deployment name> --config openclarity-config.yaml -
Open an SSH tunnel to the OpenClarity server with gcloud. For further information on how to create an SSH connection with gcloud to one of your instances check the official page.
gcloud compute ssh --project=<project id> --zone=<zone name> <name of your VM> -- -NL 8080:localhost:80 -
Access the OpenClarity UI.
-
Open the OpenClarity UI in your browser at http://localhost:8080/. The dashboard opens.
-
(Optional) If needed, you can access the API at http://localhost:8080/api. For details on the API, see the API reference.
-
Next steps
Complete the First Tasks on the UI.
Uninstall OpenClarity
-
You can uninstall OpenClarity using the gcloud manager.
gcloud deployment-manager deployments delete <openclarity deployment name>
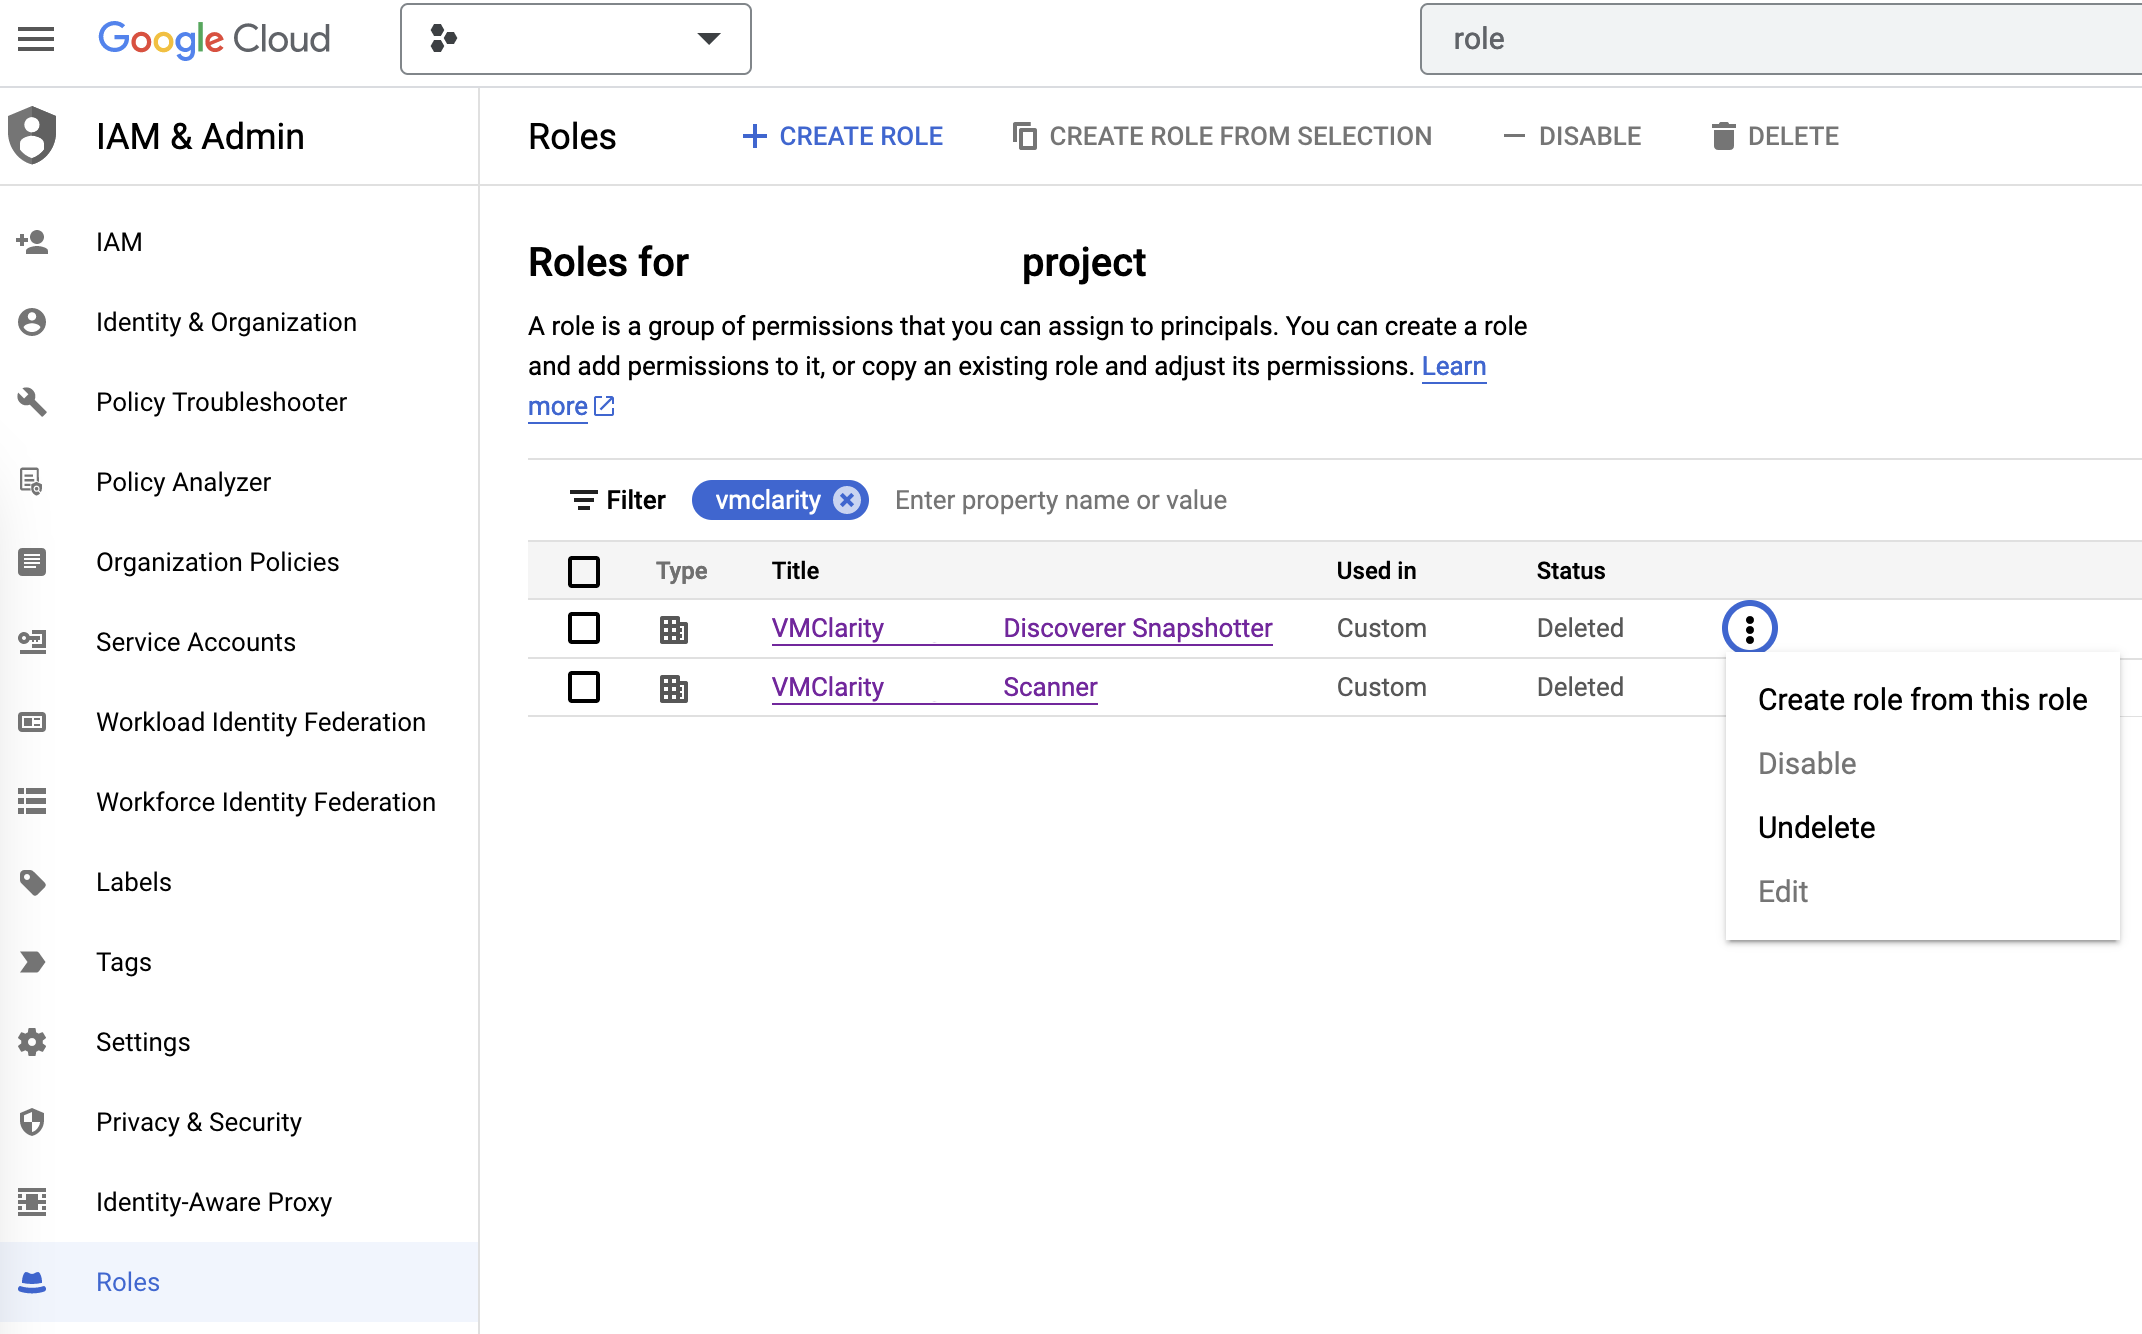
Restore deleted roles
-
On the IAM & Admin page on GCP, open the Roles tab, then search for OpenClarity in the filter input.
-
Now manually undelete the Discoverer Snapshotter and Scanner roles to set their statuses from Deleted to Enabled.
5 - Deploy on Kubernetes
Prerequisites
- Install a tool to run local Kubernetes clusters. Here, Kind is used as the default option for creating a local cluster.
- Helm to install OpenClarity.
Deployment steps
To deploy OpenClarity to your Kubernetes cluster, complete the following steps.
-
Create a Kubernetes cluster.
kind create cluster --name openclarity-k8s -
Ensure the Kubernetes cluster is up and running. If you’re using kind, you can check the status of your clusters with the following command:
kind get clusters -
Use Helm to install OpenClarity. Run the following command:
helm install openclarity oci://ghcr.io/openclarity/charts/openclarity --version 1.1.2 \ --namespace openclarity --create-namespace \ --set orchestrator.provider=kubernetes \ --set orchestrator.serviceAccount.automountServiceAccountToken=true -
Verify that all the OpenClarity pods have been successfully deployed by executing the following command:
kubectl get pods -n openclarity -
Wait until all pods are in the
Runningstate or have completed their initialization. -
Once the pods are ready, start port forwarding to access the OpenClarity gateway service. Use the following command to forward traffic from your local machine to the cluster:
kubectl port-forward -n openclarity service/openclarity-gateway 8080:80 -
Access the OpenClarity UI by navigating to http://localhost:8080/ in your web browser.
Next steps
Complete the First Tasks on the UI.
Clean up steps
-
Uninstall OpenClarity with Helm. Run the following command:
helm uninstall openclarity --namespace openclarity -
Delete the Kubernetes cluster.
kind delete clusters openclarity-k8s
6 - First Tasks on the UI
Configure your first scan
-
Open the UI.
-
Open the OpenClarity UI in your browser at http://localhost:8080/. The dashboard opens.
-
(Optional) If needed, you can access the API at http://localhost:8080/api. For details on the API, see the API reference.
-
-
Click on the Scans icon. In the Scans window, you can create a new scan configuration.

-
Click New scan configuration.

-
Follow the steps of the New scan config wizard to name the scan, and optionally narrow the scope down with an OData query.

-
Enable the scan types you want to perform.

-
Select the time and/or frequency of the scans. To run the scan immediately, select Now.

-
Optionally, adjust the number of scanners to run in parallel and whether to use spot instances on cloud providers, or not.

-
Click Save. The new scan appears on the Scan Configurations tab.

-
Once a scan is finished, you can browse around the various OpenClarity UI features and investigate the security scan reports.
