This chapter guides you through the installation of the KubeClarity backend and the CLI, and shows you the most common tasks that you can perform with KubeClarity.
1 - Install the KubeClarity backend
You can install the KubeClarity backend using Helm, or you can build and run it locally.
Prerequisites
KubeClarity requires these Kubernetes permissions:
| Permission | Reason |
|---|---|
| Read secrets in CREDS_SECRET_NAMESPACE (default: kubeclarity) | This allows you to configure image pull secrets for scanning private image repositories. |
| Read config maps in the KubeClarity deployment namespace. | This is required for getting the configured template of the scanner job. |
| List pods in cluster scope. | This is required for calculating the target pods that need to be scanned. |
| List namespaces. | This is required for fetching the target namespaces to scan in K8s runtime scan UI. |
| Create and delete jobs in cluster scope. | This is required for managing the jobs that scan the target pods in their namespaces. |
Prerequisites for AWS
If you are installing KubeClarity on AWS, complete the following steps. These are needed because KubeClarity uses a persistent PostgreSQL database, and that requires a volume.
- Make sure that your EKS cluster is 1.23 or higher.
- Install the EBS CSI Driver EKS add-on. For details, see Amazon EKS add-ons.
- Configure the EBS CSI Driver with IAMServiceRole and policies. For details, see Creating the Amazon EBS CSI driver IAM role.
Install using Helm
-
Add the Helm repository.
helm repo add kubeclarity https://openclarity.github.io/kubeclarity -
Save the default KubeClarity chart values.
helm show values kubeclarity/kubeclarity > values.yaml -
(Optional) Check the configuration in the
values.yamlfile and update the required values if needed. You can skip this step to use the default configuration.- To enable and configure the supported SBOM generators and vulnerability scanners, check the
analyzerandscannerconfigurations under thevulnerability-scannersection. You can skip this step to use the default configuration settings.
- To enable and configure the supported SBOM generators and vulnerability scanners, check the
-
Deploy KubeClarity with Helm.
-
If you have customized the
values.yamlfile, run:helm install --values values.yaml --create-namespace kubeclarity kubeclarity/kubeclarity --namespace kubeclarity -
To use the default configuration, run:
helm install --create-namespace kubeclarity kubeclarity/kubeclarity --namespace kubeclarity -
For an OpenShift Restricted SCC compatible installation, run:
helm install --values values.yaml --create-namespace kubeclarity kubeclarity/kubeclarity --namespace kubeclarity --set global.openShiftRestricted=true \
--set kubeclarity-postgresql.securityContext.enabled=false --set kubeclarity-postgresql.containerSecurityContext.enabled=false \
--set kubeclarity-postgresql.volumePermissions.enabled=true --set kubeclarity-postgresql.volumePermissions.securityContext.runAsUser="auto" \
--set kubeclarity-postgresql.shmVolume.chmod.enabled=false
-
-
Wait until all the pods are in ‘Running’ state. Check the output of the following command:
kubectl get pods --namespace kubeclarityThe output should be similar to:
NAME READY STATUS RESTARTS AGE kubeclarity-kubeclarity-7689c7fbb7-nlhh5 1/1 Running 0 82s kubeclarity-kubeclarity-grype-server-79b6fb4b88-5xtbh 1/1 Running 0 82s kubeclarity-kubeclarity-postgresql-0 1/1 Running 0 82s kubeclarity-kubeclarity-sbom-db-6895d97d5d-55jnj 1/1 Running 0 82s -
Port-forward to the KubeClarity UI.
kubectl port-forward --namespace kubeclarity svc/kubeclarity-kubeclarity 9999:8080 -
(Optional) Install a sample application (sock shop) to run your scans on.
-
Create a namespace for the application.
kubectl create namespace sock-shop -
Install the application.
kubectl apply -f https://raw.githubusercontent.com/microservices-demo/microservices-demo/master/deploy/kubernetes/complete-demo.yaml -
Check that the installation was successful.
kubectl get pods --namespace sock-shopExpected output:
NAME                            READY   STATUS    RESTARTS   AGE
carts-5dc994cf5b-4rhfj          2/2     Running   0          44h
carts-db-556cbbd5fb-64qls       2/2     Running   0          44h
catalogue-b7b968c97-b9k8p       2/2     Running   0          44h
catalogue-db-f7547dd6-smzk2     2/2     Running   0          44h
front-end-848c97475d-b7sl8      2/2     Running   0          44h
orders-7d47794476-9fjsx         2/2     Running   0          44h
orders-db-bbfb8f8-7ndr6         2/2     Running   0          44h
payment-77bd4bbdf6-hkzh7        2/2     Running   0          44h
queue-master-6d4cf8c4ff-pzk68   2/2     Running   0          44h
rabbitmq-9dd69888f-6lzfh        3/3     Running   0          44h
session-db-7d9d77c495-zngsn     2/2     Running   0          44h
shipping-67fff9d476-t87jw       2/2     Running   0          44h
user-7b667cd8d-q8bg8            2/2     Running   0          44h
user-db-5599d45948-vxpq6        2/2     Running   0          44h
-
-
Open the KubeClarity UI in your browser at http://localhost:9999/. The KubeClarity dashboard should appear. KubeClarity UI has no data to report vulnerabilities after a fresh install, so there is no data on the dashboard.

-
If you also want to try KubeClarity using its command-line tool, Install the CLI. Otherwise, you can run runtime scans using the dashboard.
Uninstall using Helm
Later if you have finished experimenting with KubeClarity, you can delete the backend by completing the following steps.
-
Helm uninstall
helm uninstall kubeclarity --namespace kubeclarity -
Clean the resources. By default, Helm doesn’t remove the PVCs and PVs for the StatefulSets. Run the following command to delete them all:
kubectl delete pvc -l app.kubernetes.io/instance=kubeclarity --namespace kubeclarity
Build and run locally with demo data
-
Build the UI and the backend and start the backend locally, either using Docker, or without it:
-
Using docker:
-
Build UI and backend (the image tag is set using VERSION):
VERSION=test make docker-backend -
Run the backend using demo data:
docker run -p 9999:8080 -e FAKE_RUNTIME_SCANNER=true -e FAKE_DATA=true -e ENABLE_DB_INFO_LOGS=true -e DATABASE_DRIVER=LOCAL ghcr.io/openclarity/kubeclarity:test run
-
-
Local build:
-
Build UI and backend
make ui && make backend -
Copy the built site:
cp -r ./ui/build ./site -
Run the backend locally using demo data:
FAKE_RUNTIME_SCANNER=true DATABASE_DRIVER=LOCAL FAKE_DATA=true ENABLE_DB_INFO_LOGS=true ./backend/bin/backend run
-
-
-
Open the KubeClarity UI in your browser: http://localhost:9999/
2 - Install the CLI
KubeClarity includes a CLI that can be run locally and is especially useful for CI/CD pipelines. It allows you to analyze images and directories to generate SBOM, and scan it for vulnerabilities. The results can be exported to the KubeClarity backend.
You can install the KubeClarity CLI using the following methods:
Binary Distribution
- Download the release distribution for your OS from the releases page.
- Unpack the
kubeclarity-clibinary, then add it to your PATH.
Docker Image
A Docker image is available at ghcr.io/openclarity/kubeclarity-cli with list of
available tags here.
Local Compilation
-
Run:
make cli -
Copy
./cli/bin/clito your PATH underkubeclarity-cli.
Next step
Check the common tasks you can do using the web UI.
3 - First tasks - UI
After you have installed the KubeClarity backend and the KubeClarity CLI, complete the following tasks to see the basic functionality of KubeClarity web UI.
Runtime scan
To start a runtime scan, complete the following steps.
-
Open the UI in your browser at http://localhost:9999/.
-
From the navigation bar on the left, select Runtime Scan.

-
Select the namespace you want to scan, for example, the
sock-shopnamespace if you have installed the demo application, then click START SCAN. You can select multiple namespaces.
-
Wait until the scan is completed, then check the results. The scan results report the affected components such as Applications, Application Resources, Packages, and Vulnerabilities.

-
Click on these elements for details. For example, Applications shows the applications in the namespace that have vulnerabilities detected.
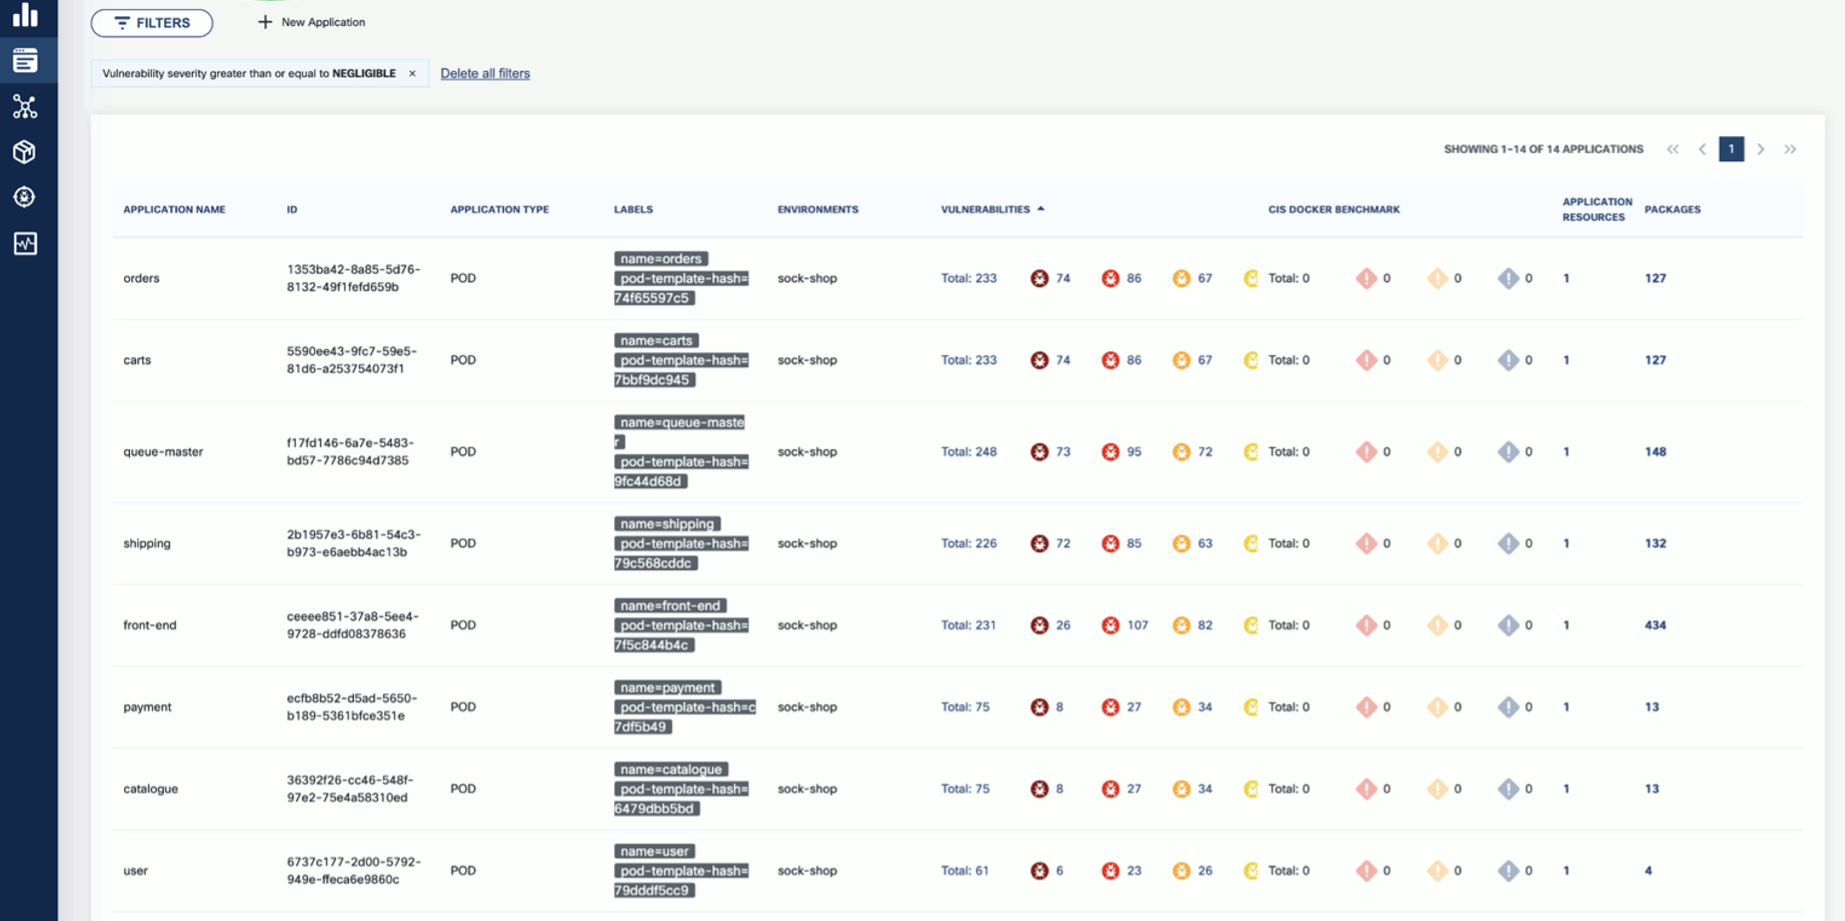
-
Now that you have run a scan, a summary of the results also appears on the dashboard page of the UI.

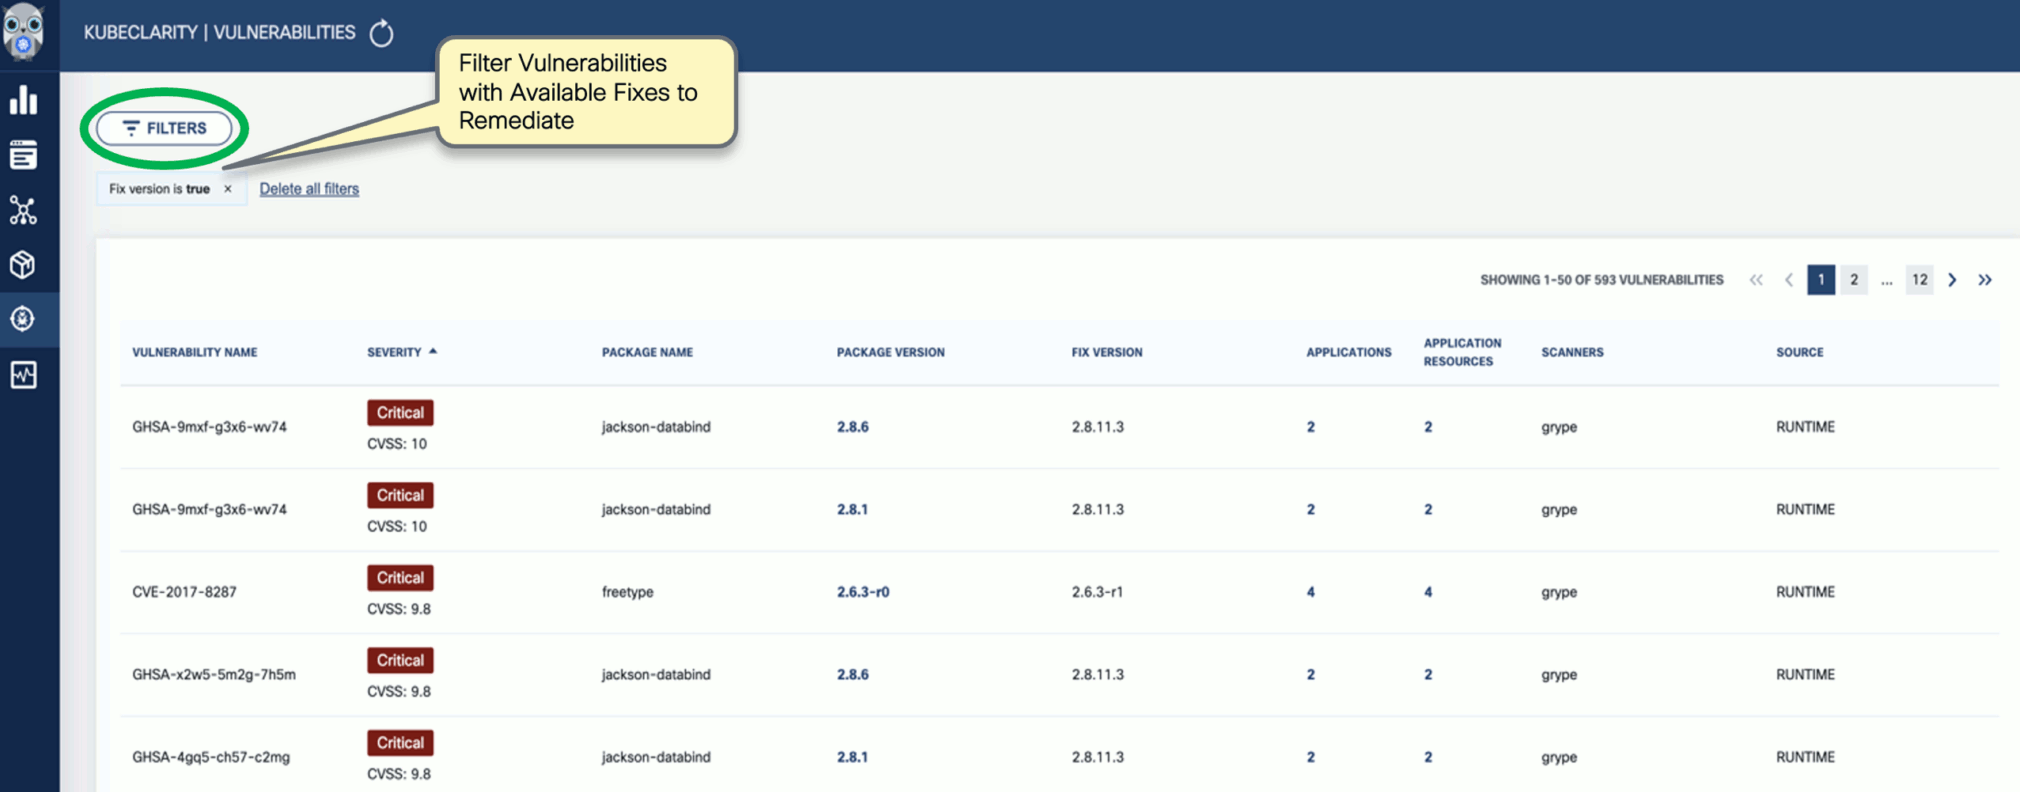
Vulnerability scan
-
To see the results of a vulnerability scan, select the Vulnerabilities page in KubeClarity UI. It shows a report including the vulnerability names, severity, the package of origin, available fixes, and attribution to the scanner that reported the vulnerability.

-
You can click on any of these fields to access more in-depth information. For example, click on the name of a vulnerability in the VULNERABILITY NAME column.

-
Select CVSS to show the CVSS scores and other details reported from the scanning process.

-
Navigate back to the Vulnerabilities view to explore the filtering options. Filtering helps you reduce noise and improve efficiency in identifying and potentially fixing crucial vulnerabilities.
-
The KubeClarity Dashboard gives you insights into vulnerability trends and fixable vulnerabilities.
Next step
Check the common tasks you can do using the CLI tool.
4 - First tasks - CLI
After you have installed the KubeClarity backend and the KubeClarity CLI, and completed the first tasks on the UI, complete the following tasks to see the basic functionality of the KubeClarity CLI.
Generate SBOM
To generate the Software Bill of Materials (SBOM), complete the following steps.
-
Run the following command.
kubeclarity-cli analyze <image/directory name> --input-type <dir|file|image(default)> -o <output file or stdout>For example:
kubeclarity-cli analyze --input-type image nginx:latest -o nginx.sbomExample output:
INFO[0000] Called syft analyzer on source registry:nginx:latest analyzer=syft app=kubeclarity INFO[0004] Skipping analyze unsupported source type: image analyzer=gomod app=kubeclarity INFO[0004] Sending successful results analyzer=syft app=kubeclarity INFO[0004] Got result for job "syft" app=kubeclarity INFO[0004] Got result for job "gomod" app=kubeclarity INFO[0004] Skip generating hash in the case of image -
Verify that the
ngnix.sbomfile is generated and explore its contents as in below:head ngnix.sbomExample output:
{ "bomFormat": "CycloneDX", "specVersion": "1.4", "serialNumber": "urn:uuid:8cca2aa3-1aaa-4e8c-9d44-08e88b1df50d", "version": 1, "metadata": { "timestamp": "2023-05-19T16:27:27-07:00", "tools": [ { "vendor": "kubeclarity", -
To run also the trivy scanner and merge the output into a single SBOM, run:
ANALYZER_LIST="syft gomod trivy" kubeclarity-cli analyze --input-type image nginx:latest -o nginx.sbomExample output:
INFO[0000] Called syft analyzer on source registry:nginx:latest  analyzer=syft app=kubeclarity
INFO[0004] Called trivy analyzer on source image nginx:latest  analyzer=trivy app=kubeclarity
INFO[0004] Skipping analyze unsupported source type: image  analyzer=gomod app=kubeclarity
INFO[0005] Sending successful results                    analyzer=syft app=kubeclarity
INFO[0005] Sending successful results                    analyzer=trivy app=kubeclarity
INFO[0005] Got result for job "trivy"                    app=kubeclarity
INFO[0005] Got result for job "syft"                     app=kubeclarity
INFO[0005] Got result for job "gomod"                    app=kubeclarity
INFO[0005] Skip generating hash in the case of image
Vulnerability scan
You can scan vulnerabilities by running the appropriate commands. The CLI provides flexibility and automation capabilities for integrating vulnerability scanning into your existing workflows or CI/CD pipelines. The tool allows scanning an image, directory, file, or a previously generated SBOM.
Usage:
kubeclarity-cli scan <image/sbom/directory/file name> --input-type <sbom|dir|file|image(default)> -f <output file>
Example:
kubeclarity-cli scan nginx.sbom --input-type sbom
You can list the vulnerability scanners to use using the SCANNERS_LIST environment variable separated by a space (SCANNERS_LIST="<Scanner1 name> <Scanner2 name>"). For example:
SCANNERS_LIST="grype trivy" kubeclarity-cli scan nginx.sbom --input-type sbom
Example output:
INFO[0000] Called trivy scanner on source sbom nginx.sbom  app=kubeclarity scanner=trivy
INFO[0000] Loading DB. update=true                       app=kubeclarity mode=local scanner=grype
INFO[0000] Need to update DB                             app=kubeclarity scanner=trivy
INFO[0000] DB Repository: ghcr.io/aquasecurity/trivy-db  app=kubeclarity scanner=trivy
INFO[0000] Downloading DB...                             app=kubeclarity scanner=trivy
INFO[0010] Gathering packages for source sbom:nginx.sbom  app=kubeclarity mode=local scanner=grype
INFO[0010] Found 136 vulnerabilities                     app=kubeclarity mode=local scanner=grype
INFO[0011] Sending successful results                    app=kubeclarity mode=local scanner=grype
INFO[0011] Got result for job "grype"                    app=kubeclarity
INFO[0012] Vulnerability scanning is enabled             app=kubeclarity scanner=trivy
INFO[0012] Detected SBOM format: cyclonedx-json          app=kubeclarity scanner=trivy
INFO[0012] Detected OS: debian                           app=kubeclarity scanner=trivy
INFO[0012] Detecting Debian vulnerabilities...           app=kubeclarity scanner=trivy
INFO[0012] Number of language-specific files: 1          app=kubeclarity scanner=trivy
INFO[0012] Detecting jar vulnerabilities...              app=kubeclarity scanner=trivy
INFO[0012] Sending successful results                    app=kubeclarity scanner=trivy
INFO[0012] Found 136 vulnerabilities                     app=kubeclarity scanner=trivy
INFO[0012] Got result for job "trivy"                    app=kubeclarity
INFO[0012] Merging result from "grype"                   app=kubeclarity
INFO[0012] Merging result from "trivy"                   app=kubeclarity
NAME              INSTALLED                FIXED-IN  VULNERABILITY     SEVERITY    SCANNERS
curl              7.74.0-1.3+deb11u7                 CVE-2023-23914    CRITICAL    grype(*), trivy(*)
curl              7.74.0-1.3+deb11u7                 CVE-2023-27536    CRITICAL    grype(*), trivy(*)
libcurl4          7.74.0-1.3+deb11u7                 CVE-2023-27536    CRITICAL    grype(*), trivy(*)
libdb5.3          5.3.28+dfsg1-0.8                   CVE-2019-8457     CRITICAL    grype(*), trivy(*)
libcurl4          7.74.0-1.3+deb11u7                 CVE-2023-23914    CRITICAL    grype(*), trivy(*)
perl-base         5.32.1-4+deb11u2                   CVE-2023-31484    HIGH        grype(*), trivy(*)
libss2            1.46.2-2                           CVE-2022-1304     HIGH        grype(*), trivy(*)
bash              5.1-2+deb11u1                      CVE-2022-3715     HIGH        grype(*), trivy(*)
Export results to KubeClarity backend
To export the CLI results to the KubeClarity backend, complete the following steps.
-
To export CLI-generated results to the backend, from the left menu bar select Applications, then copy the ID from the KubeClarity UI. If your application is not listed yet, select + New Application, and create a new pod.
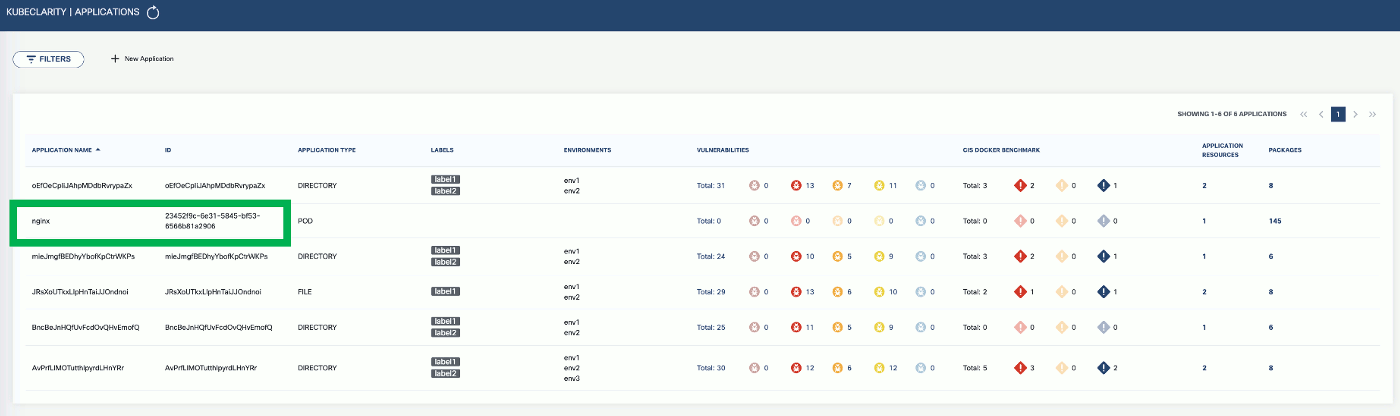
-
To export the generated SBOMs to a running KubeClarity backend pod, use the
-eflag and the ID as the<application ID>value in the following command.BACKEND_HOST=<KubeClarity backend address> BACKEND_DISABLE_TLS=true kubeclarity-cli analyze <image> --application-id <application ID> -e -o <SBOM output file>For example:
BACKEND_HOST=localhost:9999 BACKEND_DISABLE_TLS=true kubeclarity-cli analyze nginx:latest --application-id 23452f9c-6e31-5845-bf53-6566b81a2906 -e -o nginx.sbomExample output:
INFO[0000] Called syft analyzer on source registry:nginx:latest analyzer=syft app=kubeclarity INFO[0004] Called trivy analyzer on source image nginx:latest analyzer=trivy app=kubeclarity INFO[0004] Skipping analyze unsupported source type: image analyzer=gomod app=kubeclarity INFO[0004] Sending successful results analyzer=syft app=kubeclarity INFO[0004] Got result for job "syft" app=kubeclarity INFO[0004] Got result for job "gomod" app=kubeclarity INFO[0004] Sending successful results analyzer=trivy app=kubeclarity INFO[0004] Got result for job "trivy" app=kubeclarity INFO[0004] Skip generating hash in the case of image INFO[0004] Exporting analysis results to the backend: localhost:8080 app=kubeclarity -
To export the vulnerability scan results to the KubeClarity backend, set the
BACKEND_HOSTenvironment variable and the-eflag.Note: Until TLS is supported, set
BACKEND_DISABLE_TLS=true.BACKEND_HOST=<KubeClarity backend address> BACKEND_DISABLE_TLS=true kubeclarity-cli scan <image> --application-id <application ID> -eFor example:
SCANNERS_LIST="grype" BACKEND_HOST=localhost:9999 BACKEND_DISABLE_TLS=true kubeclarity-cli scan nginx.sbom --input-type sbom --application-id 23452f9c-6e31-5845-bf53-6566b81a2906 -e - Now you can see the exported results on the UI, for example, on the Dashboard page.
Next step
Now that you have finished the getting started guide, explore the UI, or check the documentation for other use cases.