This is the multi-page printable view of this section.
Click here to print.
Return to the regular view of this page.
Runtime scan
Scanning your runtime Kubernetes clusters is essential to proactively detect and address vulnerabilities in real-time, ensuring the security and integrity of your applications and infrastructure. By continuously monitoring and scanning your clusters, you can mitigate risks, prevent potential attacks, and maintain a strong security posture in the dynamic Kubernetes environment.
For details on the concepts of KubeClarity runtime scan, see Kubernetes cluster runtime scan.
1 - Run a runtime scan
To start a runtime scan, complete the following steps.
-
Open the UI in your browser at http://localhost:9999/.
-
From the navigation bar on the left, select Runtime Scan.

-
Select the namespace you want to scan, for example, the sock-shop namespace if you have installed the demo application, then click START SCAN. You can select multiple namespaces.

-
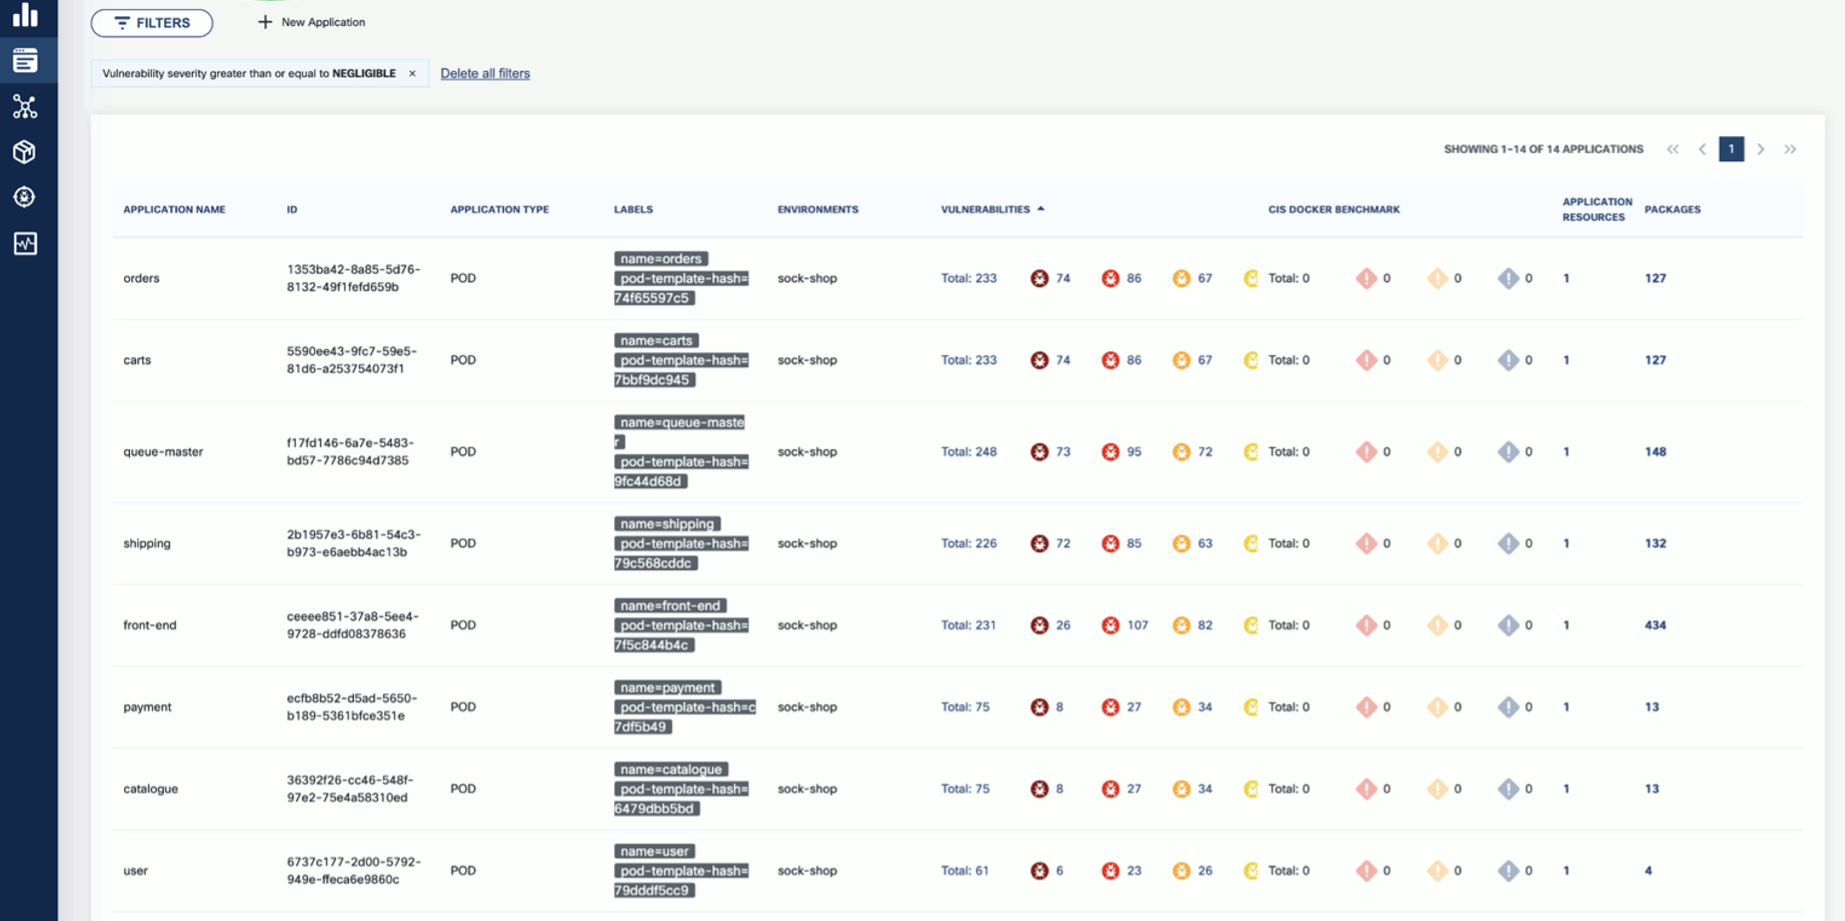
Wait until the scan is completed, then check the results. The scan results report the affected components such as Applications, Application Resources, Packages, and Vulnerabilities.

-
Click on these elements for details. For example, Applications shows the applications in the namespace that have vulnerabilities detected.
-
Now that you have run a scan, a summary of the results also appears on the dashboard page of the UI.

2 - Schedule runtime scan
To schedule a runtime scan that runs at a specific time, complete the following steps. You can also configure recurring scans to periodically scan your namespaces.
-
Open the UI in your browser at http://localhost:9999/.
-
From the navigation bar on the left, select Runtime Scan.
-
Click Schedule Scan.

-
Select the namespace or namespaces you want to scan.

-
(Optional) If you have already configured CIS benchmarks, you can select CIS Docker Benchmark to enable them for the scheduled scan.
-
Set the type of the scan.
- Later: Run the scan once at the specified time.
- Repetitive: A recurring scan that runs periodically.

-
Set the time of the scan, then click SAVE.
- For a one-time scan, set the date and time when it should run.
- For a repetitive scan, set its frequency.

3 - Configure CIS benchmarks
Developed by the Center for Internet Security (CIS), CIS benchmarks provide industry-recognized guidelines and recommendations for securing systems, networks, and software applications.
CIS Benchmarks are consensus-based guidelines that outline recommended security configurations and settings for various technology platforms, including operating systems, databases, web servers, and more. For more details, see CIS Docker Benchmark: Guidance for securing Docker containers and
CIS Kubernetes Benchmark: Guidance for securing Kubernetes clusters.
By following these steps and customizing the CIS benchmarks configuration in the values.yaml file, you can effectively run and assess your Kubernetes cluster’s adherence to the CIS benchmarks and evaluate fatal, info, and warning level findings. To configure KubeClarity for running CIS benchmarks, complete the following steps.
-
Clone or download the KubeClarity repository to your local machine, and open the values.yaml file in a text editor.
-
Locate the cis-docker-benchmark-scanner section.
-
Customize the configuration based on your specific requirements. You can enable or disable specific CIS benchmarks, set thresholds, and define compliance levels.
For example:
cis-docker-benchmark-scanner:
## Docker Image values.
docker:
  ## Use to overwrite the global docker params
  ##
  imageName: ""

## Scanner logging level (debug, info, warning, error, fatal, panic).
logLevel: warning

## Timeout for the cis docker benchmark scanner job.
timeout: "2m"

resources:
  requests:
    memory: "50Mi"
    cpu: "50m"
  limits:
    memory: "1000Mi"
    cpu: "1000m"
-
Save the changes to the configuration file.
-
Deploy the KubeClarity backend in your Kubernetes cluster using the modified values.yaml file.
-
Once KubeClarity is up and running, it automatically applies the configured CIS benchmarks and evaluates your Kubernetes cluster against them.
-
Monitor the KubeClarity dashboard, or check the generated reports to review your cluster’s compliance with the CIS benchmarks.
Enable CIS benchmarks
To enable the configured benchmark scans for on-demand runtime scans, complete the following steps.
-
Open the UI in your browser at http://localhost:9999/.
-
From the navigation bar on the left, select Runtime Scan, then Options.

-
Enable the CIS Docker Benchmark option, then click SAVE.

CIS benchmark results
-
If you run a scan with CIS benchmarks enabled, the scan results are shown in the scan report:

-
You can drill down further by applying filters. The filter allows you to narrow down the results and focus on the specific aspects you are interested in. Use the provided filters to navigate the CIS benchmark details and access the necessary information for your compliance analysis.

-
Click on a group in the AFFECTED ELEMENTS row to see the alerts and the details.
-
Click CIS Docker Benchmark to see a drill-down view of CIS Benchmarks and a detailed benchmark description. This deeper level of visibility enables you to investigate and address the alerts more effectively, ensuring the security and compliance of your Kubernetes environment.
