Vulnerability scanning identifies weak spots in software code and dependencies. Vulnerability scanners can identify infrastructure, networks, applications, or website vulnerabilities. These tools scan various target systems for security flaws that attackers could exploit.
This is the multi-page printable view of this section. Click here to print.
Vulnerability scan
- 1: Run a vulnerability scan
- 2: Vulnerability scanning a local docker image
- 3: Remote scanner servers for CLI
- 3.1: Trivy
- 3.2: Grype
- 3.3: Dependency track
1 - Run a vulnerability scan
You can scan vulnerabilities by running the appropriate commands. The CLI provides flexibility and automation capabilities for integrating vulnerability scanning into your existing workflows or CI/CD pipelines. The tool allows scanning an image, directory, file, or a previously generated SBOM.
Usage:
kubeclarity-cli scan <image/sbom/directory/file name> --input-type <sbom|dir|file|image(default)> -f <output file>
Example:
kubeclarity-cli scan nginx.sbom --input-type sbom
You can list the vulnerability scanners to use using the SCANNERS_LIST environment variable separated by a space (SCANNERS_LIST="<Scanner1 name> <Scanner2 name>"). For example:
SCANNERS_LIST="grype trivy" kubeclarity-cli scan nginx.sbom --input-type sbom
Example output:
INFO[0000] Called trivy scanner on source sbom nginx.sbom  app=kubeclarity scanner=trivy
INFO[0000] Loading DB. update=true                       app=kubeclarity mode=local scanner=grype
INFO[0000] Need to update DB                             app=kubeclarity scanner=trivy
INFO[0000] DB Repository: ghcr.io/aquasecurity/trivy-db  app=kubeclarity scanner=trivy
INFO[0000] Downloading DB...                             app=kubeclarity scanner=trivy
INFO[0010] Gathering packages for source sbom:nginx.sbom  app=kubeclarity mode=local scanner=grype
INFO[0010] Found 136 vulnerabilities                     app=kubeclarity mode=local scanner=grype
INFO[0011] Sending successful results                    app=kubeclarity mode=local scanner=grype
INFO[0011] Got result for job "grype"                    app=kubeclarity
INFO[0012] Vulnerability scanning is enabled             app=kubeclarity scanner=trivy
INFO[0012] Detected SBOM format: cyclonedx-json          app=kubeclarity scanner=trivy
INFO[0012] Detected OS: debian                           app=kubeclarity scanner=trivy
INFO[0012] Detecting Debian vulnerabilities...           app=kubeclarity scanner=trivy
INFO[0012] Number of language-specific files: 1          app=kubeclarity scanner=trivy
INFO[0012] Detecting jar vulnerabilities...              app=kubeclarity scanner=trivy
INFO[0012] Sending successful results                    app=kubeclarity scanner=trivy
INFO[0012] Found 136 vulnerabilities                     app=kubeclarity scanner=trivy
INFO[0012] Got result for job "trivy"                    app=kubeclarity
INFO[0012] Merging result from "grype"                   app=kubeclarity
INFO[0012] Merging result from "trivy"                   app=kubeclarity
NAME              INSTALLED                FIXED-IN  VULNERABILITY     SEVERITY    SCANNERS
curl              7.74.0-1.3+deb11u7                 CVE-2023-23914    CRITICAL    grype(*), trivy(*)
curl              7.74.0-1.3+deb11u7                 CVE-2023-27536    CRITICAL    grype(*), trivy(*)
libcurl4          7.74.0-1.3+deb11u7                 CVE-2023-27536    CRITICAL    grype(*), trivy(*)
libdb5.3          5.3.28+dfsg1-0.8                   CVE-2019-8457     CRITICAL    grype(*), trivy(*)
libcurl4          7.74.0-1.3+deb11u7                 CVE-2023-23914    CRITICAL    grype(*), trivy(*)
perl-base         5.32.1-4+deb11u2                   CVE-2023-31484    HIGH        grype(*), trivy(*)
libss2            1.46.2-2                           CVE-2022-1304     HIGH        grype(*), trivy(*)
bash              5.1-2+deb11u1                      CVE-2022-3715     HIGH        grype(*), trivy(*)
Export results to KubeClarity backend
To export the CLI results to the KubeClarity backend, complete the following steps.
-
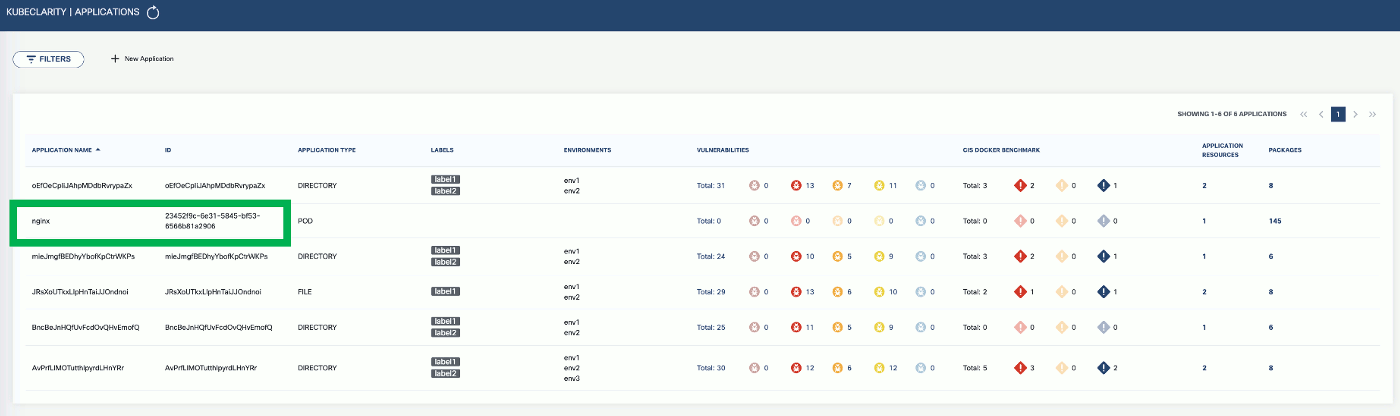
To export CLI-generated results to the backend, from the left menu bar select Applications, then copy the ID from the KubeClarity UI. If your application is not listed yet, select + New Application, and create a new pod.
-
To export the vulnerability scan results to the KubeClarity backend, set the
BACKEND_HOSTenvironment variable and the-eflag.Note: Until TLS is supported, set
BACKEND_DISABLE_TLS=true.BACKEND_HOST=<KubeClarity backend address> BACKEND_DISABLE_TLS=true kubeclarity-cli scan <image> --application-id <application ID> -eFor example:
SCANNERS_LIST="grype" BACKEND_HOST=localhost:9999 BACKEND_DISABLE_TLS=true kubeclarity-cli scan nginx.sbom --input-type sbom --application-id 23452f9c-6e31-5845-bf53-6566b81a2906 -e - Now you can see the exported results on the UI.
Check scan results on the UI
-
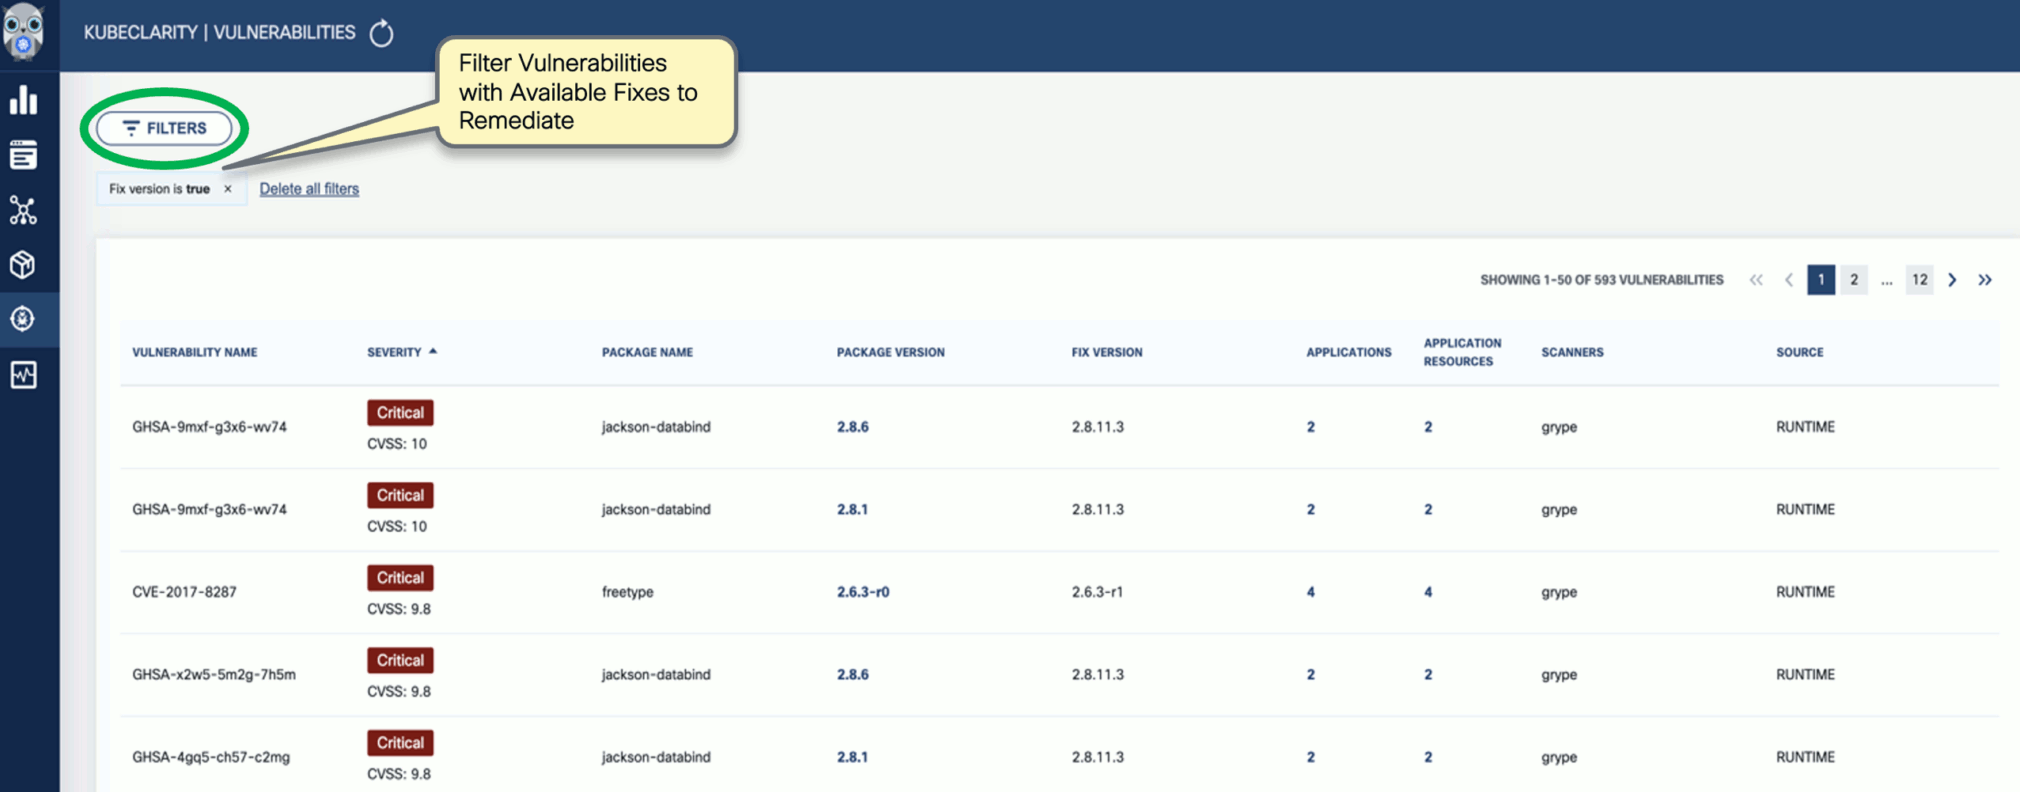
To see the results of a vulnerability scan, select the Vulnerabilities page in KubeClarity UI. It shows a report including the vulnerability names, severity, the package of origin, available fixes, and attribution to the scanner that reported the vulnerability.

-
You can click on any of these fields to access more in-depth information. For example, click on the name of a vulnerability in the VULNERABILITY NAME column.

-
Select CVSS to show the CVSS scores and other details reported from the scanning process.

-
Navigate back to the Vulnerabilities view to explore the filtering options. Filtering helps you reduce noise and improve efficiency in identifying and potentially fixing crucial vulnerabilities.
-
The KubeClarity Dashboard gives you insights into vulnerability trends and fixable vulnerabilities.

2 - Vulnerability scanning a local docker image
You can scan local docker images using the LOCAL_IMAGE_SCAN environment variable.
-
Generate the SBOM for your local docker image. For example:
LOCAL_IMAGE_SCAN=true kubeclarity-cli analyze nginx:latest -o nginx.sbom -
Run the vulnerability scan on the output:
LOCAL_IMAGE_SCAN=true kubeclarity-cli scan nginx.sbom
3 - Remote scanner servers for CLI
When running the KubeClarity CLI to scan for vulnerabilities, the CLI needs to download the relevant vulnerability databases to the location where the KubeClarity CLI is running. Running the CLI in a CI/CD pipeline will result in downloading the databases on each run, wasting time and bandwidth. For this reason, several of the supported scanners have a remote mode in which a server is responsible for the database management and possibly scanning of the artifacts.
Note: The examples below are for each of the scanners, but they can be combined to run together the same as they can be in non-remote mode.
3.1 - Trivy
The Trivy scanner supports remote mode using the Trivy server. The Trivy server can be deployed as documented here: Trivy client-server mode.
Instructions to install the Trivy CLI are available here: Trivy install.
The Aqua team provides an official container image that can be used to run the server in Kubernetes or docker, which we’ll use in the examples.
-
Start the server:
docker run -p 8080:8080 --rm aquasec/trivy:0.41.0 server --listen 0.0.0.0:8080 -
Run a scan using the server:
SCANNERS_LIST="trivy" SCANNER_TRIVY_SERVER_ADDRESS="http://<trivy server address>:8080" ./kubeclarity_cli scan --input-type sbom nginx.sbom
Authentication
The Trivy server also provides token based authentication to prevent unauthorized use of a Trivy server instance. You can enable it by running the server with --token flag:
docker run -p 8080:8080 --rm aquasec/trivy:0.41.0 server --listen 0.0.0.0:8080 --token mytoken
Then pass the token to the scanner:
SCANNERS_LIST="trivy" SCANNER_TRIVY_SERVER_ADDRESS="http://<trivy server address>:8080" SCANNER_TRIVY_SERVER_TOKEN="mytoken" ./kubeclarity_cli scan --input-type sbom nginx.sbom
3.2 - Grype
Grype supports remote mode using grype-server, a RESTful grype wrapper which provides an API that receives an SBOM and returns the grype scan results for that SBOM. Grype-server ships as a container image, so can be run in Kubernetes or via Docker standalone.
-
Start the server:
docker run -p 9991:9991 --rm gcr.io/eticloud/k8sec/grype-server:v0.1.5 -
Run a scan using the server:
SCANNERS_LIST="grype" SCANNER_GRYPE_MODE="remote" SCANNER_REMOTE_GRYPE_SERVER_ADDRESS="<grype server address>:9991" SCANNER_REMOTE_GRYPE_SERVER_SCHEMES="https" ./kubeclarity_cli scan --input-type sbom nginx.sbom
If the grype server is deployed with TLS, you can override the default URL scheme like this:
SCANNERS_LIST="grype" SCANNER_GRYPE_MODE="remote" SCANNER_REMOTE_GRYPE_SERVER_ADDRESS="<grype server address>:9991" SCANNER_REMOTE_GRYPE_SERVER_SCHEMES="https" ./kubeclarity_cli scan --input-type sbom nginx.sbom
3.3 - Dependency track
Generate certificates
First generate a self-signed RSA key and certificate that the server can use for TLS.
openssl req -x509 -nodes -days 365 -newkey rsa:2048 -keyout /tmp/dt.key -out /tmp/dt.crt -subj "/CN=dependency-track-apiserver.dependency-track/O=dependency-track-apiserver.dependency-track"
Create a dependency-track application running in a Kubernetes cluster
-
Create a secret for ingress.
kubectl create ns dependency-track kubectl create secret tls dtsecret --key /tmp/dt.key --cert /tmp/dt.crt -n dependency-track -
Deploy nginx ingress controller
helm upgrade --install ingress-nginx ingress-nginx \ --repo https://kubernetes.github.io/ingress-nginx \ --namespace ingress-nginx --create-namespace -
Deploy dependency-track.
helm repo add evryfs-oss https://evryfs.github.io/helm-charts/ helm install dependency-track evryfs-oss/dependency-track --namespace dependency-track --create-namespace -f values.yaml kubectl apply -f dependency-track.ingress.yaml-
Get dependency-track API server LoadBalancer IP
API_SERVICE_IP=$(kubectl get svc -n dependency-track dependency-track-apiserver -o jsonpath='{.status.loadBalancer.ingress[0].ip}') echo $API_SERVICE_IP 34.69.242.184 -
Update API_BASE_URL environment variable in the
values.yamlfile with the$API_SERVICE_IPvalue.For example, if the service IP is
API_SERVICE_IP=34.69.242.184:- name: API_BASE_URL value: "http://34.69.242.184:80" -
Upgrade dependency-track to include the new values.
helm upgrade dependency-track evryfs-oss/dependency-track --namespace dependency-track --create-namespace -f values.yaml
kubectl apply -f dependency-track.ingress.yaml
-
Get ingress LoadBalancer IP
INGRESSGATEWAY_SERVICE_IP=$(kubectl get svc -n ingress-nginx ingress-nginx-controller -o jsonpath='{.status.loadBalancer.ingress[0].ip}')
echo $INGRESSGATEWAY_SERVICE_IP
34.135.8.34
Add a DNS record
Add a DNS record into the /etc/hosts file for the NGINX loadblancer IP address. For example, for INGRESSGATEWAY_SERVICE_IP=34.135.8.34:
$ cat /etc/hosts
##
# Host Database
#
# localhost is used to configure the loopback interface
# when the system is booting.  Do not change this entry.
##
127.0.0.1	localhost
255.255.255.255	broadcasthost
::1             localhost
# Added by Docker Desktop
# To allow the same kube context to work on the host and the container:
127.0.0.1 kubernetes.docker.internal
# End of section
34.135.8.34 dependency-track-apiserver.dependency-track
Test with curl
curl -vvv -k https://dependency-track-apiserver.dependency-track/api/version
Do a test scan
-
Extract the API Key by completing the following steps.
kubectl -n dependency-track port-forward svc/dependency-track-frontend 7777:80 &- Open http://localhost:7777 in your browser. (Username/password is admin:admin)
- Navigate to Administration > Access Management > Teams and get an API Key.
-
Run a test scan. Replace
XXXwith your API key.SCANNER_DEPENDENCY_TRACK_INSECURE_SKIP_VERIFY=true \ SCANNER_DEPENDENCY_TRACK_DISABLE_TLS=false \ SCANNER_DEPENDENCY_TRACK_HOST=dependency-track-apiserver.dependency-track \ SCANNER_DEPENDENCY_TRACK_API_KEY=XXX \ kubeclarity-ctl scan sbom.cyclonedx -i sbom -o sbom-result.json -
Create a port-forward (replace
XXXwith your API key).kubectl --namespace dependency-track port-forward svc/dependency-track-apiserver 8081:80 SCANNER_DEPENDENCY_TRACK_DISABLE_TLS=true \ SCANNER_DEPENDENCY_TRACK_HOST=localhost:8081 \ SCANNER_DEPENDENCY_TRACK_API_KEY=XXX \ kubeclarity-ctl scan sbom.cyclonedx -i sbom -o sbom-result.json
Cleanup
If you want to delete dependency-track and the related resources, run the following commands.
helm uninstall dependency-track -n dependency-track
helm uninstall ingress-nginx -n ingress-nginx
kubectl delete ns dependency-track ingress-nginx