This is the multi-page printable view of this section.
Click here to print.
Return to the regular view of this page.
VM Security
VMClarity is an open source tool for agentless detection and management of Virtual Machine Software Bill Of Materials (SBOM) and security threats such as vulnerabilities, exploits, malware, rootkits, misconfigurations and leaked secrets.
VMClarity is the tool responsible for VM Security in the OpenClarity platform.
Join VMClarity’s Slack channel to hear about the latest announcements and upcoming activities. We would love to get your feedback!
Why VMClarity?
Virtual machines (VMs) are the most used service across all hyperscalers. AWS,
Azure, GCP, and others have virtual computing services that are used not only
as standalone VM services but also as the most popular method for hosting
containers (e.g., Docker, Kubernetes).
VMs are vulnerable to multiple threats:
- Software vulnerabilities
- Leaked Secrets/Passwords
- Malware
- System Misconfiguration
- Rootkits
There are many very good open source and commercial-based solutions for
providing threat detection for VMs, manifesting the different threat categories above.
However, there are challenges with assembling and managing these tools yourself:
- Complex installation, configuration, and reporting
- Integration with deployment automation
- Siloed reporting and visualization
The VMClarity project is focused on unifying detection and management of VM security threats in an agentless manner.
Overview
VMClarity uses a pluggable scanning infrastructure to provide:
- SBOM analysis
- Package and OS vulnerability detection
- Exploit detection
- Leaked secret detection
- Malware detection
- Misconfiguration detection
- Rootkit detection
The pluggable scanning infrastructure uses several tools that can be
enabled/disabled on an individual basis. VMClarity normalizes, merges and
provides a robust visualization of the results from these various tools.
These tools include:
- SBOM Generation and Analysis
- Vulnerability detection
- Exploits
- Secrets
- Malware
- Misconfiguration
- Rootkits
A high-level architecture overview is available in Architecture.
Roadmap
VMClarity project roadmap is available here.
1 - Architecture
Today, VMClarity has two halves, the VMClarity control plane, and the
VMClarity CLI.
The VMClarity control plane includes several microservices:
-
API Server: The VMClarity API for managing all objects in the VMClarity
system. This is the only component in the system which talks to the DB.
-
Orchestrator: Orchestrates and manages the life cycle of VMClarity
scan configs, scans and asset scans. Within the Orchestrator there is a
pluggable “provider” which connects the orchestrator to the environment to be
scanned and abstracts asset discovery, VM snapshotting as well as creation of
the scanner VMs. (Note The only supported provider today is AWS, other
hyperscalers are on the roadmap)
-
UI Backend: A separate backend API which offloads some processing from
the browser to the infrastructure to process and filter data closer to the
source.
-
UI Webserver: A server serving the UI static files.
-
DB: Stores the VMClarity objects from the API. Supported options are
SQLite and Postgres.
-
Scanner Helper services: These services provide support to the VMClarity
CLI to offload work that would need to be done in every scanner, for example
downloading the latest vulnerability or malware signatures from the various DB
sources. The components included today are:
- grype-server: A rest API wrapper around the grype vulnerability scanner
- trivy-server: Trivy vulnerability scanner server
- exploitDB server: A test API which wraps the Exploit DB CVE to exploit mapping logic
- freshclam-mirror: A mirror of the ClamAV malware signatures
The VMClarity CLI contains all the logic for performing a scan, from mounting
attached volumes and all the pluggable infrastructure for all the families, to
exporting the results to VMClarity API.
These components are containerized and can be deployed in a number of different
ways. For example our cloudformation installer deploys VMClarity on a VM using
docker in an dedicated AWS Virtual Private Cloud (VPC).
Once the VMClarity server instance has been deployed, and the scan
configurations have been created, VMClarity will discover VM resources within
the scan range defined by the scan configuration (e.g., by region, instance
tag, and security group). Once the asset list has been created, snapshots of
the assets are taken, and a new scanner VM are launched using the snapshots as
attached volumes. The VMClarity CLI running within the scanner VM will perform
the configured analysis on the mounted snapshot, and report the results to the
VMClarity API. These results are then processed by the VMClarity backend into
findings.

2 - Getting started
This chapter guides you through the installation of the VMClarity backend and the CLI, and shows you the most common tasks that you can perform with VMClarity.
2.1 - Deploy on AWS
An AWS CloudFormation template is provided for quick deployment of the VMClarity environment.
Note: To avoid extra costs (cross-region snapshots), you may want to deploy the VMClarity AWS CloudFormation template in the same region where the majority of the VMs are that you want to scan with VMClarity.
The following figure shows the basic AWS resources that the VMClarity CloudFormation template creates:
-
a VPC with a public and private subnet, and
-
an AWS Internet Gateway (IGW) and NAT Gateway (NGW) into the VPC.

The public subnet (VmClarityServerSubnet) hosts the VMClarity Server (VmClarityServer) EC2 instance. The VMClarity server houses the scanning configuration, the UI, and other control components. The EC2 instance is assigned an external IPv4 address (EIP) for SSH and web UI access.
The private subnet (VmClarityScannerSubnet) hosts the VM snapshot instances (EC2) that are scanned for security vulnerabilities.
Prerequisites
Deployment steps
To deploy the VMClarity AWS CloudFormation Stack, you can:
- click this quick-create link to navigate directly to the AWS CloudFormation console and jump to the wizard instructions, or
- complete the following steps.
-
Download the latest VMClarity release.
wget https://github.com/openclarity/vmclarity/releases/download/v0.7.2/aws-cloudformation-v0.7.2.tar.gz
Alternatively, copy the AWS CloudFormation template file from the project repository to deploy the latest development code and skip the next step.
-
Create a new directory and extract the files.
mkdir aws-cloudformation-v0.7.2
tar -xvzf aws-cloudformation-v0.7.2.tar.gz -C aws-cloudformation-v0.7.2
-
Log in to the AWS CloudFormation console and go to the AWS CloudFormation Stacks section, then select Create Stack > With New Resources (standard).
-
Check Template is ready and Upload a template file, then click Upload a template file/Choose file and upload the previously downloaded CFN template file.

-
In the VMClarity CloudFormation Stack wizard, set the following:
- Enter a name for the stack.
- Select the InstanceType (defaults to
t2.large for the VMClarity Server, and the scanner VMs). - Specify the SSH key for the EC2 instance in the KeyName field. You will need this key to connect to VMClarity.
- Adjust SSHLocation according to your policies.
- Do not change AdvancedConfiguration, unless you are building from a custom registry.
- Click NEXT.
- (Optional) Add tags as needed for your environment. You can use the defaults unless you need to adjust for your own policies.
- Click NEXT, then scroll to the bottom of the screen, and check I acknowledge….
- Click SUBMIT.
-
Once the stack is deployed successfully, copy the VMClarity SSH address from the Outputs tab.

-
Open an SSH tunnel to VMClarity the server
ssh -N -L 8080:localhost:80 -i "<Path to the SSH key specified during install>" ubuntu@<VmClarity SSH Address copied during install>
-
Access the VMClarity UI.
-
Open the VMClarity UI in your browser at http://localhost:8080/. The dashboard opens.
-
(Optional) If needed, you can access the API athttp://localhost:8080/api. For details on the API, see API reference.
Next steps
Complete the First tasks on the UI.
2.2 - Deploy on Azure
Prerequisites
Deployment steps
-
Click here to deploy VMClarity’s custom template.
-
Fill out the required Project details and Instance details in the Basics tab.

You can set the following parameters:
| Parameter | Required | Description |
| Subscription | True | Azure subscription where resources will be billed. |
| Region | False | Azure region where resources will be deployed. |
| VMClarity Deploy Postfix | True | Postfix for Azure resource group name (e.g. vmclarity-<postfix>). |
| VMClarity Server SSH Username | True | SSH Username for the VMClarity Server Virtual Machine. |
| VMClarity Server SSH Public Key | True | SSH Public Key for the VMClarity Server Virtual Machine. Paste the contents of ~/.ssh/id_rsa2.pub here. |
| VMClarity Server VM Size | True | The size of the VMClarity Server Virtual Machine. |
| VMClarity Scanner VMs Size | True | The size of the VMClarity Scanner Virtual Machines. |
| Security Type | False | Security Type of the VMClarity Server Virtual Machine, e.g. TrustedLaunch (default) or Standard. |
-
(Optional) In the Advanced tab, modify the Container Image for each service if a specific VMClarity version is required. Then, select the delete policy and the database.

| Parameter | Required | Description |
| Service Container Image | True | Docker Container Image to use for each service. |
| Asset Scan Delete Policy | True | Delete Policy for resources created when performing an asset scan, e.g. Always, OnSuccess or Never. |
| Database To Use | True | Database type to use, e.g. SQLite, PostgreSQL or External PostgreSQL. |
-
Click Review + create to create the deployment.
-
Once the deployment is completed successfully, copy the VMClarity SSH address from the Outputs tab.

-
Open an SSH tunnel to VMClarity the server
ssh -N -L 8080:localhost:80 -i "<Path to the SSH key specified during install>" ubuntu@<VmClarity SSH Address copied during install>
-
Access the VMClarity UI.
-
Open the VMClarity UI in your browser at http://localhost:8080/. The dashboard opens.
-
(Optional) If needed, you can access the API athttp://localhost:8080/api. For details on the API, see API reference.
Next steps
Complete the First tasks on the UI.
2.3 - Deploy on Docker
Prerequisites
Deployment steps
To run VMClarity in Docker on a local machine, complete the following steps.
-
Download the latest VMClarity release.
wget https://github.com/openclarity/vmclarity/releases/download/v0.7.2/docker-compose-v0.7.2.tar.gz
-
Create a new directory, extract the files and navigate to the directory.
mkdir docker-compose-v0.7.2
tar -xvzf docker-compose-v0.7.2.tar.gz -C docker-compose-v0.7.2
cd docker-compose-v0.7.2
-
Start every control plane element with the docker compose file.
docker compose --project-name vmclarity --file docker-compose.yml up -d --wait --remove-orphans
The output should be similar to:
[+] Running 14/14
⠿ Network vmclarity                        Created                                                       0.2s
⠿ Volume "vmclarity_grype-server-db"       Created                                                       0.0s
⠿ Volume "vmclarity_apiserver-db-data"     Created                                                       0.0s
⠿ Container vmclarity-orchestrator-1       Healthy                                                      69.7s
⠿ Container vmclarity-yara-rule-server-1   Healthy                                                      17.6s
⠿ Container vmclarity-exploit-db-server-1  Healthy                                                      17.7s
⠿ Container vmclarity-swagger-ui-1         Healthy                                                       7.8s
⠿ Container vmclarity-trivy-server-1       Healthy                                                      26.7s
⠿ Container vmclarity-uibackend-1          Healthy                                                      17.6s
⠿ Container vmclarity-ui-1                 Healthy                                                       7.7s
⠿ Container vmclarity-freshclam-mirror-1   Healthy                                                       7.8s
⠿ Container vmclarity-grype-server-1       Healthy                                                      37.3s
⠿ Container vmclarity-gateway-1            Healthy                                                       7.7s
⠿ Container vmclarity-apiserver-1          Healthy                                                      17.7s
Please note that the image_override.env file enables you to use the images you build yourself. You can override parameters in the docker-compose.yml by passing a custom env file to the docker compose up command via the --env-file flag. The /installation/docker/image_override.env file contains an example overriding all the container images.
-
Check the running containers in the Docker desktop.

-
Access the VMClarity UI. Navigate to http://localhost:8080/ in your browser.
Next steps
Complete the First tasks on the UI.
Clean up steps
-
After you’ve finished your tasks, stop the running containers.
docker compose --project-name vmclarity --file docker-compose.yml down --remove-orphans
2.4 - Deploy on GCP
Prerequisites
- You can install VMClarity using the CLI, so you have to have gcloud on your
computer available beforehand. For details on installing and configuring gcloud, see the official installation guide.
- If you have already installed VMClarity before and want to reinstall it, you have to manually restore deleted roles that were created during the previous installation.
Deployment steps
To install VMClarity on Google Cloud Platform (GCP), complete the following steps.
-
Download the newest GCP deployment release from GitHub and extract it to any location.
wget https://github.com/openclarity/vmclarity/releases/download/v0.7.2/gcp-deployment-v0.7.2.tar.gz
-
Create a new directory, extract the files and navigate to the directory.
mkdir gcp-deployment-v0.7.2
tar -xvzf gcp-deployment-v0.7.2.tar.gz -C gcp-deployment-v0.7.2
cd gcp-deployment-v0.7.2
-
Copy the example configuration file and rename it.
cp vmclarity-config.example.yaml vmclarity-config.yaml
-
The following table contains all the fields that can be set in the vmclarity-config.yaml file. You have to set at
least the required ones.
| Field | Required | Default | Description |
zone | yes | | The Zone to locate the VMClarity server. |
machineType | yes | | The machine type for the VMClarity server. |
region | yes | | The region to locate VMClarity. |
scannerMachineType | | e2-standard-2 | Machine type to use for the Scanner instances. |
scannerSourceImage | | projects/ubuntu-os-cloud/global/images/ubuntu-2204-jammy-v20230630 | Source image to use for the Scanner instances. |
databaseToUse | | SQLite | The database that VMClarity should use. |
apiserverContainerImage | | ghcr.io/openclarity/vmclarity-apiserver:0.7.2 | The container image to use for the apiserver. |
orchestratorContainerImage | | ghcr.io/openclarity/vmclarity-orchestrator:0.7.2 | The container image to use for the orchestrator. |
uiContainerImage | | ghcr.io/openclarity/vmclarity-ui:0.7.2 | The container image to use for the ui. |
uibackendContainerImage | | ghcr.io/openclarity/vmclarity-ui-backend:0.7.2 | The container image to use for the uibackend. |
scannerContainerImage | | ghcr.io/openclarity/vmclarity-cli:0.7.2 | The container image to use for the scanner. |
exploitDBServerContainerImage | | ghcr.io/openclarity/exploit-db-server:v0.2.4 | The container image to use for the exploit db server. |
trivyServerContainerImage | | docker.io/aquasec/trivy:0.41.0 | The container image to use for the trivy server. |
grypeServerContainerImage | | ghcr.io/openclarity/grype-server:v0.7.0 | The container image to use for the grype server. |
freshclamMirrorContainerImage | | ghcr.io/openclarity/freshclam-mirror:v0.2.0 | The container image to use for the fresh clam mirror server. |
postgresqlContainerImage | | docker.io/bitnami/postgresql:12.14.0-debian-11-r28 | The container image to use for the postgresql server. |
assetScanDeletePolicy | | Always | When asset scans should be cleaned up after scanning. |
postgresDBPassword | | | Postgres DB password. Only required if DatabaseToUse is Postgresql. |
externalDBName | | | DB to use in the external DB. Only required if DatabaseToUse is External. |
externalDBUsername | | | Username for the external DB. Only required if the DatabaseToUse is External. |
externalDBPassword | | | Password for the external DB. Only required if the DatabaseToUse is External. |
externalDBHost | | | Hostname or IP for the external DB. Only required if the DatabaseToUse is External. |
externalDBPort | | | Port for the external DB. Only required if the DatabaseToUse is External. |
-
Deploy VMClarity using gcloud deployment-manager.
gcloud deployment-manager deployments create <vmclarity deployment name> --config vmclarity-config.yaml
-
Open an SSH tunnel to the VMClarity server with gcloud. For further information on how to create an SSH connection
with gcloud to one of your instances check the official page.
gcloud compute ssh --project=<project id> --zone=<zone name> <name of your VM> -- -NL 8080:localhost:80
-
Access the VMClarity UI.
-
Open the VMClarity UI in your browser at http://localhost:8080/. The dashboard opens.
-
(Optional) If needed, you can access the API athttp://localhost:8080/api. For details on the API, see API reference.
Next steps
Complete the First tasks on the UI.
Uninstall VMClarity
-
You can uninstall VMClarity using the gcloud manager.
gcloud deployment-manager deployments delete <vmclarity deployment name>
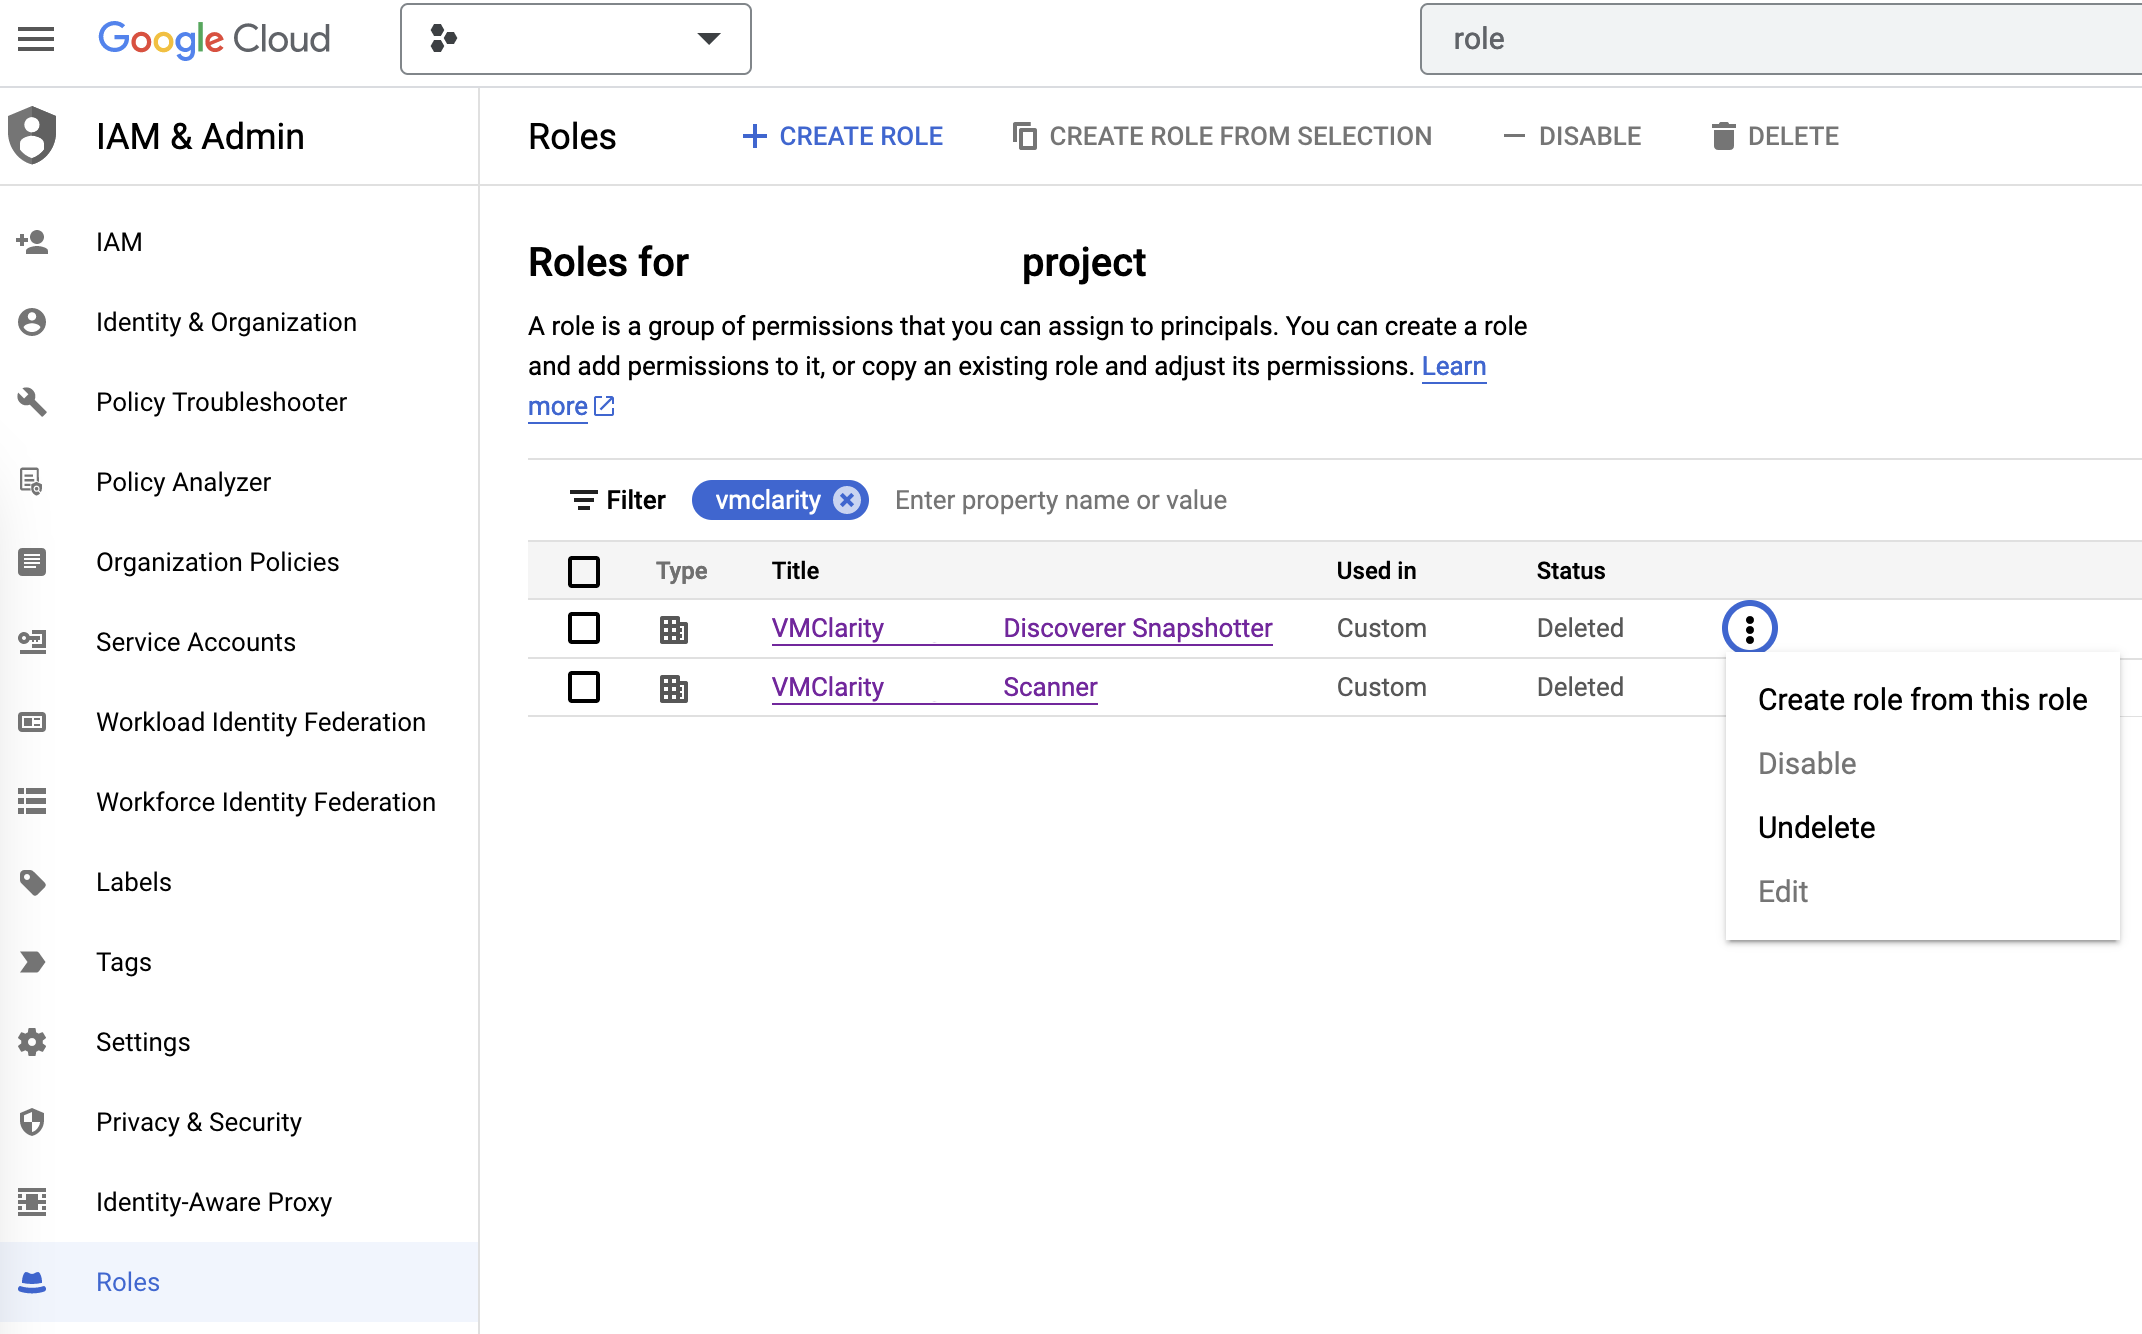
Restore deleted roles
-
On the IAM & Admin page on GCP, open the Roles tab, then search for VMClarity in the filter input.
-
Now manually undelete the Discoverer Snapshotter and Scanner roles to set their statuses from Deleted to Enabled.
2.5 - Deploy on Kubernetes
Prerequisites
- Install a tool to run local Kubernetes clusters. Here, Kind is used as the default option for creating a local cluster.
- Helm to install VMClarity.
Deployment steps
To deploy VMClarity to your Kubernetes cluster, complete the following steps.
-
Create a Kubernetes cluster.
kind create cluster --name vmclarity-k8s
-
Ensure the Kubernetes cluster is up and running. If you’re using kind, you can check the status of your clusters with the following command:
-
Use Helm to install VMClarity. Run the following command:
helm install vmclarity oci://ghcr.io/openclarity/charts/vmclarity --version 0.7.2 \
    --namespace vmclarity --create-namespace \
    --set orchestrator.provider=kubernetes \
    --set orchestrator.serviceAccount.automountServiceAccountToken=true
-
Verify that all the VMClarity pods have been successfully deployed by executing the following command:
kubectl get pods -n vmclarity
-
Wait until all pods are in the Running state or have completed their initialization.
-
Once the pods are ready, start port forwarding to access the VMClarity gateway service. Use the following command to forward traffic from your local machine to the cluster:
kubectl port-forward -n vmclarity service/vmclarity-gateway 8080:80
-
Access the VMClarity UI by navigating to http://localhost:8080/ in your web browser.
Next steps
Complete the First tasks on the UI.
Clean up steps
-
Uninstall VMClarity with Helm. Run the following command:
helm uninstall vmclarity --namespace vmclarity
-
Delete the Kubernetes cluster.
kind delete clusters vmclarity-k8s
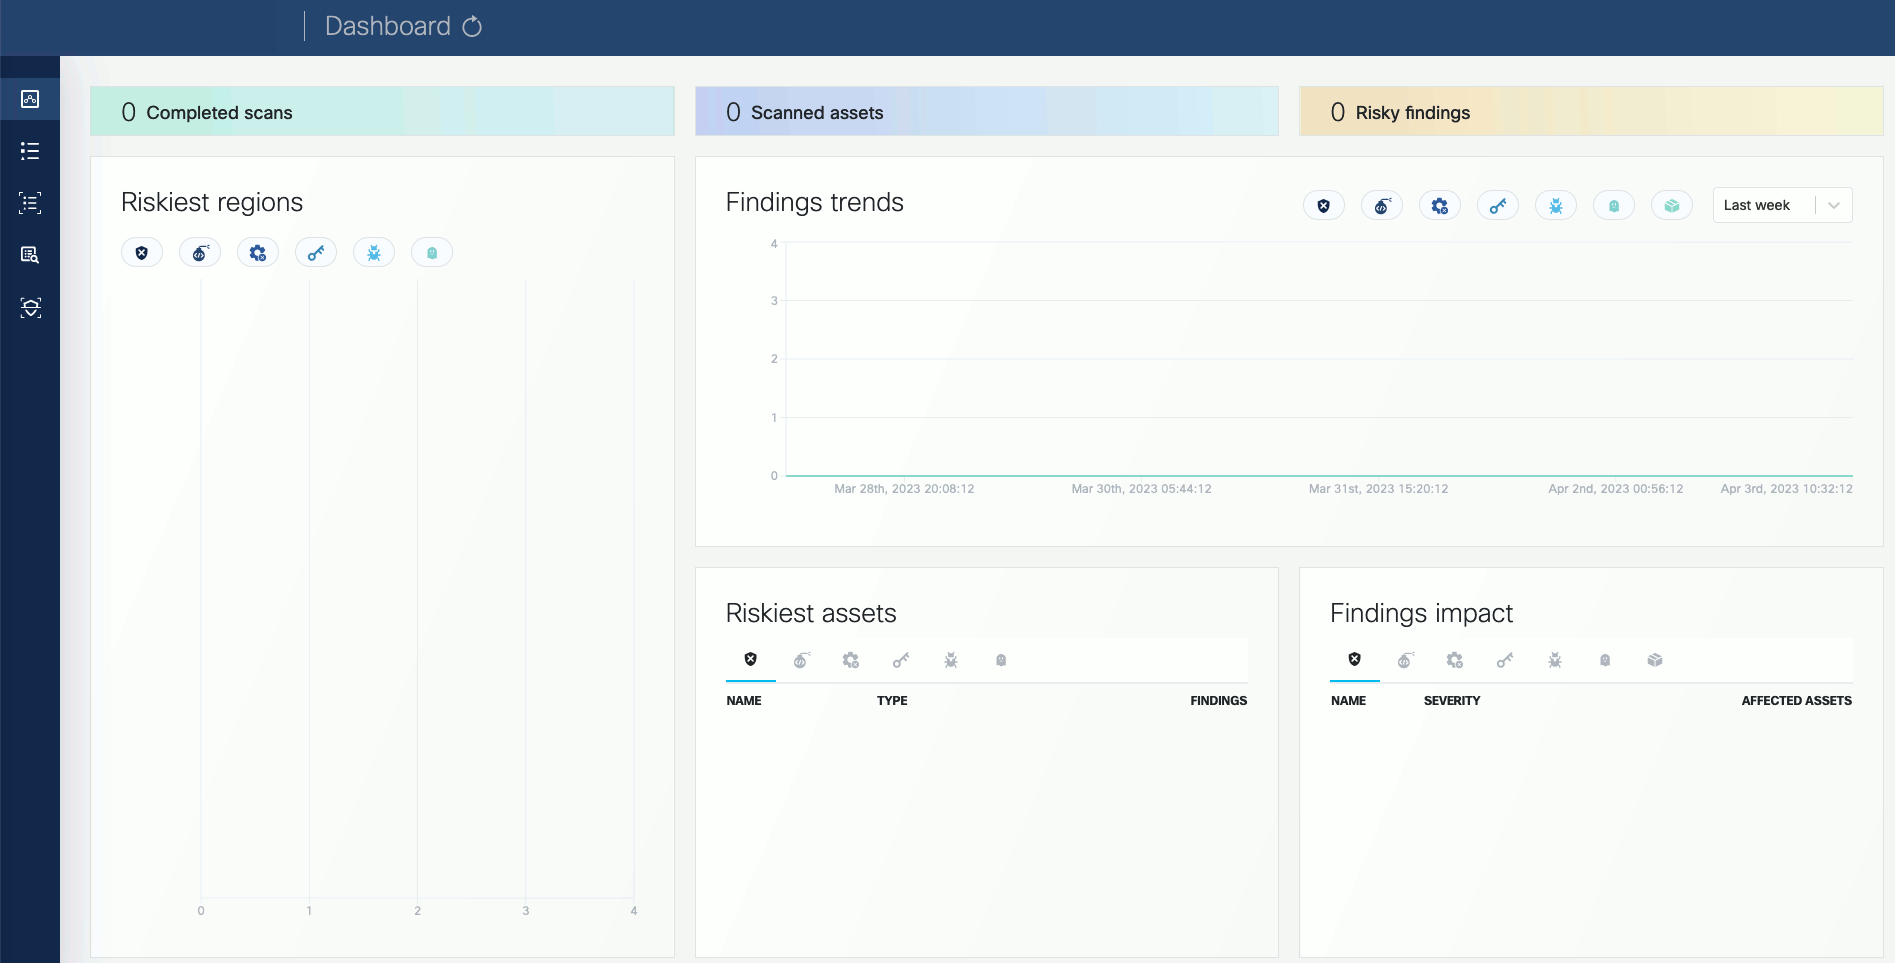
2.6 - First tasks on the UI
-
Open the UI.
-
Open the VMClarity UI in your browser at http://localhost:8080/. The dashboard opens.
-
(Optional) If needed, you can access the API athttp://localhost:8080/api. For details on the API, see API reference.
-
Click on the Scans icon. In the Scans window, you can create a new scan configuration.

-
Click New scan configuration.

-
Follow the steps of the New scan config wizard to name the scan, and identify the AWS scope (region, VPC, security groups, etc). The following example shows the AWS us-east-2 region, a specific VPC, and the vmclarity-demo-vm EC2

-
Enable the scan types you want to perform.

-
Select the time and/or frequency of the scans. To run the scan immediately, select Now.

-
Click Save. The new scan appears on the Scan Configurations tab.

-
Once a scan is finished, you can browse around the various VMClarity UI features and investigate the security scan reports.


3 - Common CLI tasks
Initiate a scan using the CLI
Reporting results into file:
./cli/bin/vmclarity-cli scan --config ~/testConf.yaml -o outputfile
If we want to report results to the VMClarity backend, we need to create asset and asset scan object before scan because it requires asset-scan-id
Reporting results to VMClarity backend:
ASSET_ID=$(./cli/bin/vmclarity-cli asset-create --file assets/dir-asset.json --server http://localhost:8080/api) --jsonpath {.id}
ASSET_SCAN_ID=$(./cli/bin/vmclarity-cli asset-scan-create --asset-id $ASSET_ID --server http://localhost:8080/api) --jsonpath {.id}
./cli/bin/vmclarity-cli scan --config ~/testConf.yaml --server http://localhost:8080/api --asset-scan-id $ASSET_SCAN_ID
Using one-liner:
./cli/bin/vmclarity-cli asset-create --file docs/assets/dir-asset.json --server http://localhost:8080/api --update-if-exists --jsonpath {.id} | xargs -I{} ./cli/bin/vmclarity-cli asset-scan-create --asset-id {} --server http://localhost:8080/api --jsonpath {.id} | xargs -I{} ./cli/bin/vmclarity-cli scan --config ~/testConf.yaml --server http://localhost:8080/api --asset-scan-id {}
4 - Configuration Parameters
Orchestrator
| Environment Variable | Required | Default | Values | Description |
VMCLARITY_ORCHESTRATOR_PROVIDER | yes | aws | aws, azure, gcp, docker | Provider used for Asset discovery and scans. |
VMCLARITY_ORCHESTRATOR_APISERVER_ADDRESS | yes | | | The URL for the API Server used by the Orchestrator to interact with the API. Example: https://apiserver.example.com:8888/api |
VMCLARITY_ORCHESTRATOR_HEALTHCHECK_ADDRESS | | :8082 | | Bind address to used by the Orchestrator for healthz endpoint. Example: localhost:8082 which will make the health endpoints be available at localhost:8082/healthz/live and localhost:8082/healthz/ready. |
VMCLARITY_ORCHESTRATOR_DISCOVERY_INTERVAL | | 2m | | How frequently the Discovery perform discovery of Assets. |
VMCLARITY_ORCHESTRATOR_CONTROLLER_STARTUP_DELAY | | 7s | | The time interval to wait between cotroller startups. Do NOT change this parameter unless you know what you are doing. |
VMCLARITY_ORCHESTRATOR_ASSETSCAN_WATCHER_POLL_PERIOD | | 15s | | How frequently poll the API for events related AssetScan objects. |
VMCLARITY_ORCHESTRATOR_ASSETSCAN_WATCHER_RECONCILE_TIMEOUT | | 5m | | Time period for reconciling a AssetScan event is allowed to run. |
VMCLARITY_ORCHESTRATOR_ASSETSCAN_WATCHER_ABORT_TIMEOUT | | 10m | | Time period to wait for the Scanner to gracefully stop on-going scan for AssetScan before setting the state of the AssetScan to Failed. |
VMCLARITY_ORCHESTRATOR_ASSETSCAN_WATCHER_DELETE_POLICY | | Always | Always, Never, OnSuccess | Whether to delete resources (disk snapshot, container snapshot/images) or not based on the status of the AssetScan. Always means the AssetScan is deleted no matter if it failed or not. Never skip cleaning up the resources created for scanning. OnSuccess means that cleanup is happening only iun case the AssetScan was successful. |
VMCLARITY_ORCHESTRATOR_ASSETSCAN_WATCHER_SCANNER_CONTAINER_IMAGE | yes | | | The Scanner container image used for running scans. |
VMCLARITY_ORCHESTRATOR_ASSETSCAN_WATCHER_SCANNER_FRESHCLAM_MIRROR | | | | |
VMCLARITY_ORCHESTRATOR_ASSETSCAN_WATCHER_SCANNER_APISERVER_ADDRESS | | | | The URL for the API Server used by the Scanner to interact with the API. Example: https://apiserver.example.com:8888/api |
VMCLARITY_ORCHESTRATOR_ASSETSCAN_WATCHER_SCANNER_EXPLOITSDB_ADDRESS | | | | The URL for the ExploitsDB Server used by the Scanner. |
VMCLARITY_ORCHESTRATOR_ASSETSCAN_WATCHER_SCANNER_TRIVY_SERVER_ADDRESS | | | | The URL for the Trivy Server used by the Scanner. |
VMCLARITY_ORCHESTRATOR_ASSETSCAN_WATCHER_SCANNER_TRIVY_SERVER_TIMEOUT | | 5m | | |
VMCLARITY_ORCHESTRATOR_ASSETSCAN_WATCHER_SCANNER_GRYPE_SERVER_ADDRESS | | | | The URL for the Grype Server used by the Scanner. |
VMCLARITY_ORCHESTRATOR_ASSETSCAN_WATCHER_SCANNER_GRYPE_SERVER_TIMEOUT | | 2m | | |
VMCLARITY_ORCHESTRATOR_ASSETSCAN_WATCHER_SCANNER_YARA_RULE_SERVER_ADDRESS | | | | The URL for the Yara Rule Server used by the Scanner. |
VMCLARITY_ORCHESTRATOR_SCANCONFIG_WATCHER_POLL_PERIOD | | | | How frequently the ScanConfig Watcher poll the API for events related ScanConfig objects. |
VMCLARITY_ORCHESTRATOR_SCANCONFIG_WATCHER_RECONCILE_TIMEOUT | | | | Time period which a reconciliation for a ScanConfig event is allowed to run. |
VMCLARITY_ORCHESTRATOR_SCAN_WATCHER_POLL_PERIOD | | | | How frequently the AssetScan Watcher poll the API for events related Scan objects. |
VMCLARITY_ORCHESTRATOR_SCAN_WATCHER_RECONCILE_TIMEOUT | | | | Time period for reconciling a Scan event is allowed to run. |
VMCLARITY_ORCHESTRATOR_SCAN_WATCHER_SCAN_TIMEOUT | | | | Time period to wait for the Scan finish before marked it’s state as Failed with Timeout as a reason. |
VMCLARITY_ORCHESTRATOR_ASSETSCAN_PROCESSOR_POLL_PERIOD | | | | How frequently the AssetScan Processor poll the API for events related AssetScan objects. |
VMCLARITY_ORCHESTRATOR_ASSETSCAN_PROCESSOR_RECONCILE_TIMEOUT | | | | Time period for processing for a AssetScan result is allowed to run. |
VMCLARITY_ORCHESTRATOR_ASSETSCAN_ESTIMATION_WATCHER_POLL_PERIOD | | 5s | | |
VMCLARITY_ORCHESTRATOR_ASSETSCAN_ESTIMATION_WATCHER_RECONCILE_TIMEOUT | | 15s | | |
VMCLARITY_ORCHESTRATOR_SCAN_ESTIMATION_WATCHER_POLL_PERIOD | | 5s | | |
VMCLARITY_ORCHESTRATOR_SCAN_ESTIMATION_WATCHER_RECONCILE_TIMEOUT | | 2m | | |
VMCLARITY_ORCHESTRATOR_SCAN_ESTIMATION_WATCHER_ESTIMATION_TIMEOUT | | 48h | | |
Provider
AWS
| Environment Variable | Required | Default | Description |
VMCLARITY_AWS_REGION | yes | | Region where the Scanner instance needs to be created |
VMCLARITY_AWS_SUBNET_ID | yes | | SubnetID where the Scanner instance needs to be created |
VMCLARITY_AWS_SECURITY_GROUP_ID | yes | | SecurityGroupId which needs to be attached to the Scanner instance |
VMCLARITY_AWS_KEYPAIR_NAME | | | Name of the SSH KeyPair to use for Scanner instance launch |
VMCLARITY_AWS_SCANNER_AMI_ID | yes | | The AMI image used for creating Scanner instance |
VMCLARITY_AWS_SCANNER_INSTANCE_TYPE | | t2.large | The instance type used for Scanner instance |
VMCLARITY_AWS_BLOCK_DEVICE_NAME | | xvdh | Block device name used for attaching Scanner volume to the Scanner instance |
5 - Troubleshooting and Debugging
How to debug the Scanner VMs
How to debug the Scanner VMs can differ per provider these are documented
below.
Debug Scanner VM on AWS
On AWS VMClarity is configured to create the Scanner VMs with the same key-pair
that the VMClarity server has. The Scanner VMs run in a private network,
however the VMClarity Server can be used as a bastion/jump host to reach them
via SSH.
ssh -i <key-pair private key> -J ubuntu@<vmclarity server public IP> ubuntu@<scanner VM private IP address>
Once SSH access has been established, the status of the VM’s start up
configuration can be debugged by checking the cloud-init logs:
sudo journalctl -u cloud-final
And the vmclarity-scanner service logs:
sudo journalctl -u vmclarity-scanner
6 - VMClarity development
Building VMClarity Binaries
Makefile targets are provided to compile and build the VMClarity binaries.
make build can be used to build all of the components, but also specific
targets are provided, for example make build-cli and make build-backend to
build the specific components in isolation.
Building VMClarity Containers
make docker can be used to build the VMClarity containers for all of the
components. Specific targets for example make docker-cli and make docker-backend are also provided.
make push-docker is also provided as a shortcut for building and then
publishing the VMClarity containers to a registry. You can override the
destination registry like:
DOCKER_REGISTRY=docker.io/tehsmash make push-docker
You must be logged into the docker registry locally before using this target.
Linting
make lint can be used to run the required linting rules over the code.
golangci-lint rules and config can be viewed in the .golangcilint file in the
root of the repo.
make fix is also provided which will resolve lint issues which are
automatically fixable for example format issues.
make license can be used to validate that all the files in the repo have the
correctly formatted license header.
To lint the cloudformation template, cfn-lint can be used, see
https://github.com/aws-cloudformation/cfn-lint#install for instructions on how
to install it for your system.
Unit tests
make test can be used run all the unit tests in the repo. Alternatively you
can use the standard go test CLI to run a specific package or test like:
go test ./cli/cmd/... -run Test_isSupportedFS
Generating API code
After making changes to the API schema in api/openapi.yaml, you can run make api to regenerate the model, client and server code.
Testing End to End
For details on how to test VMClarity end to end please see End-to-End Testing Guide.
6.1 - End-to-End Testing Guide
Installing a specific VMClarity build on AWS
-
Build the containers and publish them to your docker registry
DOCKER_REGISTRY=<your docker registry> make push-docker
-
Install VMClarity cloudformation
- Ensure you have an SSH key pair uploaded to AWS Ec2
- Go to CloudFormation -> Create Stack -> Upload template.
- Upload the
VMClarity.cfn file. - Follow the wizard through to the end
- Set the
VMClarity Backend Container Image and VMClarity Scanner Container Image parameters in the wizard to use custom images (from step 1.) for deployment. - Change the Asset Scan Delete Policy to
OnSuccess or Never if debugging scanner VMs is required.
- Wait for install to complete
-
Ensure that VMClarity backend is working correctly
-
Get the IP address from the CloudFormation stack’s Output Tab
-
ssh ubuntu@<ip address>
-
Check the VMClarity Logs
sudo journalctl -u vmclarity
-
Copy the example scanConfig.json into the ubuntu user’s home directory
scp scanConfig.json ubuntu@<ip address>:~/scanConfig.json
-
Edit the scanConfig.json
-
Give the scan config a unique name
-
Enable the different scan families you want:
"scanFamiliesConfig": {
  "sbom": {
    "enabled": true
  },
  "vulnerabilities": {
    "enabled": true
  },
  "exploits": {
    "enabled": true
  }
},
-
Configure the scope of the test
-
All:
```yaml
"scope": ""
```
- Set operationTime to the time you want the scan to run. As long as the time is in the future it can be within seconds.
-
While ssh’d into the VMClarity server run
curl -X POST http://localhost:8080/api/scanConfigs -H 'Content-Type: application/json' -d @scanConfig.json
-
Check VMClarity logs to ensure that everything is performing as expected
sudo journalctl -u vmclarity
-
Monitor the asset scans
-
Get scans:
curl -X GET http://localhost:8080/api/scans
After the operationTime in the scan config created above there should be a new
scan object created in Pending.
Once discovery has been performed, the scan’s assetIDs list should be
populated will all the assets to be scanned by this scan.
The scan will then create all the “assetScans” for tracking the scan
process for each asset. When that is completed the scan will move to
“InProgress”.
-
Get asset scans:
curl -X GET http://localhost:8080/api/assetScans
8 - Cost estimation
Available in version 0.6.0 and later. Currently, this feature is exclusively available on AWS.
You can get a preliminary cost estimation before initiating a security scan with VMClarity. This helps you plan and budget your security assessments more effectively, ensuring that you have a clear understanding of the financial implications before taking action.
To start a new estimation, complete the following steps.
-
Create a new resource called ScanEstimation in the API server. For example, if your POST’s body is the following JSON, it will estimate an SBOM scan on your workload with id i-123456789.
Use the same same scanTemplate in the ScanEstimation than in the ScanConfiguration.
{
  "assetIDs": ["i-123456789"],
  "state": {
    "state": "Pending"
  },
  "scanTemplate": {
    "scope": "contains(assetInfo.tags, '{\"key\":\"scanestimation\",\"value\":\"test\"}')",
    "assetScanTemplate": {
      "scanFamiliesConfig": {
        "sbom": {
          "enabled": true
        }
      }
    }
  }
}
-
Retrieve the object from the <apiserver IP address>:8888/scanEstimations endpoint, and wait for the state to be Done. The totalScanCost of the summary property shows your scan’s cost in USD:
{
   "assetIDs":[
      "d337bd07-b67f-4cf0-ac43-f147fce7d1b2"
   ],
   "assetScanEstimations":[
      {
         "id":"23082244-0fb6-4aca-8a9b-02417dfc95f8"
      }
   ],
   "deleteAfter":"2023-10-08T17:33:52.512829081Z",
   "endTime":"2023-10-08T15:33:52.512829081Z",
   "id":"962e3a10-05fb-4c5d-a773-1198231f3103",
   "revision":5,
   "scanTemplate":{
      "assetScanTemplate":{
         "scanFamiliesConfig":{
            "sbom":{
               "enabled":true
            }
         }
      },
      "scope":"contains(assetInfo.tags, '{\"key\":\"scanestimation\",\"value\":\"test\"}')"
   },
   "startTime":"2023-10-08T15:33:37.513073573Z",
   "state":{
      "state":"Done",
      "stateMessage":"1 succeeded, 0 failed out of 1 total asset scan estimations",
      "stateReason":"Success"
   },
   "summary":{
      "jobsCompleted":1,
      "jobsLeftToRun":0,
      "totalScanCost":0.0006148403,
      "totalScanSize":3,
      "totalScanTime":12
   },
   "ttlSecondsAfterFinished":7200
}