This is the multi-page printable view of this section. Click here to print.

Return to the regular view of this page.

APIClarity

APIClarity, an open source cloud native visibility tool for APIs, uses a Service Mesh framework to capture and analyze API traffic, and identify potential risks.

Use APIClarity to compare your OpenAPI specification to its state at runtime. For apps that don’t have an OpenAPI specification, APIClarity can reconstruct a specification in a live environment.

Cloud native applications use and expose APIs, which have been the source of many highly publicized cyber-attacks and breaches. APIClarity improves your API visibility and your applications security posture.

APIClarity is the tool responsible for API Security in the OpenClarity platform.

Why APIClarity?

  • Quick and Easy API Visibility and Analysis: Reduce API security risk without code instrumentation or workload modification.
  • Comprehensive Dashboard to Monitor APIs: Evaluate OpenAPI specifications for security issues and best practices. Where there is no spec, automatically generate one.
  • Designed for Developers, Loved by Security: Detect Zombie and Shadow APIs, alert users on risks, identify changes between approved OpenAPI specs and APIs at runtime.

Challenges for API microservices

Microservice applications interact via API’s with many other applications. To minimize risk, it is valuable to have visibility to the OpenAPI specifications and to understand any potential changes to that specification throughout the application lifecycle. However, obtaining OpenAPI specs can be challenging, particularly for external or legacy applications.

Proper OpenAPI specifications can be further complicated by microservices that use deprecated APIs (a.k.a. Zombie APIs)​ or microservices that use undocumented APIs (a.k.a. Shadow APIs).

Finally, it’s important to be able to obtain Open API specifications without code instrumentation or modifying existing workloads.

  • Not all applications have their Open API specification available.​
  • How can we get this for our legacy or external applications?​​
  • Ability to detect that microservices still use deprecated APIs (a.k.a. Zombie APIs)​​
  • Ability to detect that microservices use undocumented APIs (a.k.a. Shadow APIs)​
  • Ability to get Open API specifications without code instrumentation or modifying existing workloads (seamless documentation)

How does APIClarity overcome these challenges?

  • Capture all API traffic in an existing environment using a service-mesh framework​​
  • Construct the Open API specification by observing the API traffic​​​
  • Allow the User to upload Open API spec, review, modify and approve generated Open API specs​
  • Alert the user on any difference between the approved API specification and the one that is observed in runtime, detects shadow & zombie APIs​
  • UI dashboard to audit and monitor the API findings​
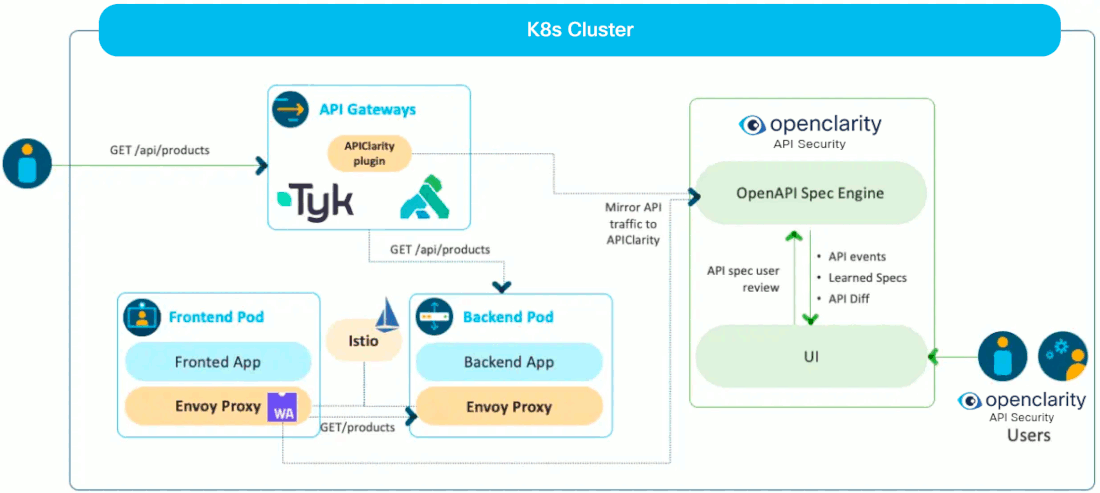
Overview

High-level architecture

APIClarity architecture

1 - Features

APIClarity is a modular tool that addresses several aspects of API Security, focusing specifically on OpenAPI based APIs.

APIClarity approaches API Security in 2 different ways:

  • Captures all API traffic in a given environment and performs a set of security analysis to discover all potential security problems with detected APIs
  • Actively tests API endpoints to detect security issues in the implementation of such APIs.

OpenAPI automatic reconstruction

Both approaches described above are way more effective when APIClarity is primed with the OpenAPI specifications of the APIs analyzed or tested. However, not all applications have an OpenAPI specification available. For this reason one of the main functionality of APIClarity is the automatic reconstruction of OpenAPI specifications based on observed API traffic. In this case, users have the ability to review and approve the reconstructed specifications.

Security Modules

APIClarity is structured in a modular architecture, which allows to easily add new functionalities. The following modules are currently implemented:

  • Spec Diffs This module compares the API traces with the OAPI specifications provided by the user or previously reconstructed. The result of this comparison provides:

    • List of API endpoints that are observed but not documented in the specs, i.e. Shadow APIs;
    • List of API endpoints that are observed but marked as deprecated in the specs, i.e. Zombie APIs;
    • List of difference between of the APIs observed and their documented specification.
  • Trace Analyzer This module analyzes path, headers and body of API requests and responses to discover potential security issues, such as weak authentications, exposure of sensitive information, potential Broken Object Level Authorizations (BOLA) etc.

  • BFLA Detector This module detects potential Broken Function Level Authorization. In particular it observes the API interactions and build an authorization model that captures what clients are supposed to be authorized to make the various API calls. Based on such authorization model it then signals violations which may represent potential issues in the API authorization procedures.

  • Fuzzer This module actively tests API endpoints based on their specification attempting in discovering security issues in the API server implementation.

Supported traffic source integrations

APIClarity supports integrating with the following traffic sources. Install APIClarity and follow the instructions per required integration.

The integrations (plugins) for the supported traffic sources above are located in the plugins directory within the codebase and implement in the plugins API to export the API events to APIClarity.

To enable and configure the supported traffic sources, see the trafficSource: section in Helm values.

Contributions that integrate additional traffic sources are more than welcome!

2 - Getting started

This chapter shows you how to install APIClarity, and guides you through the most common tasks that you can perform with APIClarity.

2.1 - Install APIClarity

Install APIClarity in a K8s cluster using Helm

  1. Add the Helm repository.

    helm repo add apiclarity https://openclarity.github.io/apiclarity
    
  2. Save the default chart values into the values.yaml file.

    helm show values apiclarity/apiclarity > values.yaml
    

    Note: The file values.yaml is used to deploy and configure APIClarity on your cluster via Helm. This ConfigMap is used to define the list of headers to ignore when reconstructing the spec.

  3. Update values.yaml with the required traffic source values.

  4. Deploy APIClarity with Helm.

    helm install --values values.yaml --create-namespace apiclarity apiclarity/apiclarity --namespace apiclarity
    
  5. Port forward to the APIClarity UI:

    kubectl port-forward --namespace apiclarity svc/apiclarity-apiclarity 9999:8080
    
  6. Open the APIClarity UI in your browser at http://localhost:9999/

  7. Generate some traffic in the traced applications, for example, using a demo application.

  8. Check the APIClarity UI.

Uninstall APIClarity from Kubernetes using Helm

  1. Uninstall the Helm deployment.

    helm uninstall apiclarity --namespace apiclarity
    
  2. Clean the resources. By default, Helm will not remove the PVCs and PVs for the StatefulSets. Run the following command to delete them all:

    kubectl delete pvc -l app.kubernetes.io/instance=apiclarity --namespace apiclarity
    

Build from source

  1. Build and push the image to your repo:

    DOCKER_IMAGE=<your docker registry>/apiclarity DOCKER_TAG=<your tag> make push-docker
    
  2. Update values.yaml accordingly.

Run locally with demo data

  1. Build the UI and the backend locally.

    make ui && make backend
    
  2. Copy the built site:

    cp -r ./ui/build ./site
    
  3. Run the backend and frontend locally using demo data:

    Note: You might need to delete the old local state file and local db:

    rm state.gob; rm db.db
    
    DATABASE_DRIVER=LOCAL K8S_LOCAL=true FAKE_TRACES=true FAKE_TRACES_PATH=./backend/pkg/test/trace_files \
    ENABLE_DB_INFO_LOGS=true ./backend/bin/backend run
    

    Note: this command requires a proper KUBECONFIG in your environment when K8S_LOCAL=true is used. If you want to run without Kubernetes, use ENABLE_K8S=false instead.

  4. Open the APIClarity UI in your browser at: http://localhost:8080/

2.2 - Install demo application

If you want to use a demo application to try APIClarity, you can use the Sock Shop Demo. To deploy the Sock Shop Demo, complete the following steps.

  1. Create the sock-shop namespace and enable Istio injection.

    kubectl create namespace sock-shop
    kubectl label namespaces sock-shop istio-injection=enabled
    
  2. Deploy the Sock Shop Demo to your cluster.

    kubectl apply -f https://raw.githubusercontent.com/microservices-demo/microservices-demo/master/deploy/kubernetes/complete-demo.yaml
    
  3. Deploy APIClarity in the sock-shop namespace (with the Istio service-mesh traffic source):

    helm repo add apiclarity https://openclarity.github.io/apiclarity
    
    helm install --set 'trafficSource.envoyWasm.enabled=true' --set 'trafficSource.envoyWasm.namespaces={sock-shop}' --create-namespace apiclarity apiclarity/apiclarity --namespace apiclarity
    
  4. Port forward to Sock Shop’s front-end service to access the Sock Shop Demo App:

    kubectl port-forward -n sock-shop svc/front-end 7777:80
    
  5. Open the Sock Shop Demo App UI in your browser at http://localhost:7777/ and run some transactions to generate data to review on the APIClarity dashboard.

3 - Enable external trace sources support

If you enable external trace sources support, APIClarity can receive the trace sources from the entities that are external to the Kubernetes cluster. External trace sources such as Gateways and Load balancers can communicate with APIClarity to report APIs and send the traces.

Supported Trace Sources

APIClarity can support with the following trace sources and follow the instructions per required integration.

Deploy APIClarity with support for external trace sources

  1. Add Helm Repo

    helm repo add apiclarity https://openclarity.github.io/apiclarity
    
  2. Update values.yaml with:

    Apiclarity -> tls -> enabled as true
    supportExternalTraceSource -> enabled as true
    
  3. Deploy APIClarity with the updated values.yaml to enable external traffic sources.

    helm install --values values.yaml --create-namespace apiclarity apiclarity/apiclarity -n apiclarity
    
  4. Port forward to the APIClarity UI:

    kubectl port-forward -n apiclarity svc/apiclarity-apiclarity 9999:8080
    
  5. Open the APIClarity UI in your browser at http://localhost:9999

Register a new external trace source

This section shows you how to access the service, register a new trace source, and how to receive the token and certificate. The examples use the Apigee X Gateway as the external trace source.

  1. Port forward for service at 8443.

    kubectl port-forward -n apiclarity svc/apiclarity-apiclarity 8443:8443
    
  2. Register a new external trace source and receive the token.

    TRACE_SOURCE_TOKEN=$(curl --http1.1 --insecure -s -H 'Content-Type: application/json' -d '{"name":"apigee_gateway","type":"APIGEE_X"}' https://localhost:8443/api/control/traceSources|jq -r '.token')
    
  3. Get the External-IP for the apiclarity-external service.

    kubectl get services --namespace apiclarity
    
  4. Use the External-IP address with the following command, then extract the certificate between -----BEGIN CERTIFICATE----- and -----END CERTIFICATE----- and save it to the server.crt file.

    openssl s_client -showcerts -connect <External-IP>:10443
    
  5. If you want to configure other trace sources, use the extracted token in Step 2 and the certificate in Step 3.

4 - API reference

4.1 - Core API reference

4.2 - Common API reference